GUI interfaces are nice and beautiful but they are usually less efficient than the command line. Let's explore how to set up API Keys in OCI (Oracle Cloud Infrastructure) to be able to use the command line instead of the OCI Console.
First of all, we need to have the oci-cli installed which is installed by default on OCI VMs:
So let's start by, let's say, try to create a bucket using the command line (you'l find the compartment id of the compartment you want to create your bucket in the compartment page, just seach for "compartment" in the OCI console):
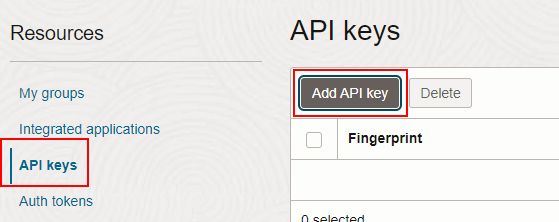
First, on the top right of the OCi console, click on your profile and "My Profile": Then, on the bottom left, on "API Keys" and "Add API Key":
 Here, you have to download your private key (and do not lose it) -- as mentioned, this is the only time you could do it so keep it safe:
 Now is shown to you the content you need to copy into that ~/.oci/config configuration file on your VM:
 Let's create this ~/.oci directory and this ~/.oci/config file:
Last but not least, mind that any oci command line has a --help option which will show you any possible option; this is pretty well documented:
And you are now ready ot use the OCI command line!
First of all, we need to have the oci-cli installed which is installed by default on OCI VMs:
[fred@myvm ~]$ type oci
oci is /usr/local/bin/oci
[fred@myvm ~]$ oci --version
3.47.0
[fred@myvm ~]$
If it is not installed on your system, the install doc can be found here for all the supported systems, it takes a minute.
So let's start by, let's say, try to create a bucket using the command line (you'l find the compartment id of the compartment you want to create your bucket in the compartment page, just seach for "compartment" in the OCI console):
[fred@myvm ~]$ oci os bucket create --name this_is_my_bucket --compartment-id gdsgshdsgbjgfjhfgdhfgdsjhgdjhgdfjds
ERROR: Could not find config file at /home/fred/.oci/config
Do you want to create a new config file? [Y/n]: n
[fred@myvm ~]$
So we are asked for a ~/.oci/config file which does not exist by default; we are also offered to create a new one; I would recommend saying no to this question, the following procedure seems awkward to me. Let's create that ~/.oci/config file manually instead.
First, on the top right of the OCi console, click on your profile and "My Profile":

[fred@myvm ~]$ mkdir ~/.oci
[fred@myvm ~]$ vi ~/.oci/config
[fred@myvm ~]$ cat ~/.oci/config
[DEFAULT]
user=ocid1.user.oc1..aaaaaabbbbbccccccccccdddddddddddeeeeeeee
fingerprint=66:xxxxxxxxxxxxxxxxx
tenancy=ocid1.tenancy.oc1.. aaaaaabbbbbccccccccccdddddddddddeeeeeeee
region=us-ashburn-1
key_file=~/.oci/fred_myvm.key
[fred@myvm ~]$
So here I have just pasted in ~/.oci/config the content I copied from the OCI console. There is only one thing to update is to point the key_file parameter to a file which contain the private key you have downloaded in the previous step; you can name this file with whatever name and extension but keep it in the ~/.oci directory. You can just open the private key you have previously downloaded and paste it in the file:
[fred@myvm ~]$ vi ~/.oci/fred_myvm.key
[fred@myvm ~]$
Same as SSH, these files are very strict on permission, thanksfully, Oracle provides a tool which sets everything correctly for us:
[fred@myvm ~]$ oci setup repair-file-permissions --file /home/fred/.oci/config
[fred@myvm ~]$ ls -altr ~/.oci
total 8
-rw-------. 1 fred fred  290 Sep 26 12:28 config
-rw-------. 1 fred fred 1716 Sep 26 12:29 fred_myvm.key
drwx------. 4 fred fred  123 Sep 26 12:29 ..
drwxrwxr-x. 2 fred fred   41 Sep 26 12:29 .
[fred@myvm ~]$
Let's nor retry to create a bucket!
[fred@myvm ~]$ oci os bucket create --name this_is_my_bucket --compartment-id ocid1.compartment.oc1..gdsgshdsgbjgfjhfgdhfgdsjhgdjhgdfjds
{
  "data": {
    "approximate-count": null,
    . . .
    "metadata": {},
    "name": "this_is_my_bucket",
    "namespace": "xxxxx",
    . . .
    "time-created": "2024-09-26T12:35:47.425000+00:00",
  . . .
}
[fred@myvm ~]$
Very cool, we have created a bucket using the command line. Note that I didn't need to specify any profile in my command line as the API keys I added in my ~/.oci/config are in the DEFAULT profile (by the way, profile names are key sensitive and the default one is DEFAULT and not default):
[fred@myvm ~]$ cat ~/.oci/config
[DEFAULT]
user=ocid1.user.oc1..aaaaaabbbbbccccccccccdddddddddddeeeeeeee
fingerprint=66:xxxxxxxxxxxxxxxxx
tenancy=ocid1.tenancy.oc1.. aaaaaabbbbbccccccccccdddddddddddeeeeeeee
region=us-ashburn-1
[fred@myvm ~]$
Note that you can change this which would allow you to use many different configurations to being able to connect to different tenancies from the same OS user or connect to different users (with different privileges) to the same tenancy:
[fred@myvm ~]$ cat ~/.oci/config
[PROD1]
user=ocid1.user.oc1..aaaaaabbbbbccccccccccdddddddddddeeeeeeee
fingerprint=66:xxxxxxxxxxxxxxxxx
tenancy=ocid1.tenancy.oc1..aaaaaabbbbbccccccccccdddddddddddeeeeeeee
region=us-ashburn-1
[PROD2]
user=ocid1.user.oc1..xxxxxxxxxyyyyyyyzzzzzzzzzzz
fingerprint=66:zzzzzzzzzzz
tenancy=ocid1.tenancy.oc1..xxxxxxxxxyyyyyyyzzzzzzzzzzz
region=us-ashburn-1
[fred@myvm ~]$
Above shows a configuration pointing to 2 different tenancies: PROD1 and PROD2. Let's say I created the bucket above in PROD1, I now have to specificy the profile to use as there is no default anymore:
[fred@myvm ~]$ oci os object list --all --bucket-name this_is_my_bucket ERROR: The config file at ~/.oci/config is invalid: +Config Errors+---------+----------------------------------------------------------------------------------+ | Key | Error | Hint | +-------------+---------+----------------------------------------------------------------------------------+ | user | missing | log into the console and go to the user's settings page to find their OCID | | fingerprint | missing | openssl rsa -pubout -outform DER -inUnfortunately, you cannot add more to that ~/.oci/config file; it would indeed by handy for example to be able to add the compartment-id not to have to specift it in all the command lines which require it but it may come later, who knows.| openssl md5 -c | | key_file | missing | the full path and filename of the private PEM key file | | region | missing | for example, us-phoenix-1 | | tenancy | missing | log into the console and find this OCID at the bottom of any page | +-------------+---------+----------------------------------------------------------------------------------+ [fred@myvm ~]$ oci os object list --all --bucket-name this_is_my_bucket --profile PROD1 { "prefixes": [] <== there is nothing in my bucket which is expected } [fred@myvm ~]$
Last but not least, mind that any oci command line has a --help option which will show you any possible option; this is pretty well documented:
[fred@myvm ~]$ oci --help
. . .
[fred@myvm ~]$ oci os bucket create --help
. . .
[fred@myvm ~]$
Let's drop that example bucket to keep things clean:
[fred@myvm ~]$ oci os bucket delete --name this_is_my_bucket --profile PROD1
Are you sure you want to delete this bucket? [y/N]: y
[fred@myvm ~]$


No comments:
Post a Comment