Twitter

Showing posts with label scripts. Show all posts

Some bash tips -- 18 -- paste

This blog is part of a shell tips list which are good to know -- the whole list can be found here.

I really like finding a real usage for a Unix command you heard of, you have somewhere in your quiver but you never really used because you never found an opportunity to or you never found the good combo which makes it very powerful. Let's explore the power of paste which we will end up combining with fold, shuf and column.

First, let's generate a simple list of numbers, one number per line using seq:
$ seq 1 7
1
2
3
4
5
6
7
$
Now let's say you want to organize these numbers by columns of two numbers. Hmmm not that easy right? this where paste shines:
$ seq 1 7 | paste - -
1       2
3       4
5       6
7
$
See these 2 hyphens in paste - -? There are the number of columns you want paste to organize your data in; you want 4 columns? just use 4 hyphens:
$ seq 1 7 | paste - - - - 
1       2       3       4
5       6       7
$
It also makes very easy something oftenly hapenning: rows to columns. paste has the -s/--serial option for that, check below:
$ seq 1 7 | paste -s
1       2       3       4       5       6       7
$
Pretty cool, right? And maybe a CSV type output would be a very good idea as well. paste also got you covered; Indeed, by default paste uses a TAB as a separator which we can change using -d/--delimiters:
$ seq 1 7 | paste -s -d ","
1,2,3,4,5,6,7
$
And what about a CSV with 2 columns per line?
$ seq 1 7 | paste - -  -d ","
1,2
3,4
5,6
7,
$
Note that all of that also works from a file as well:
$ seq 1 7 > test_file
$ cat test_file | paste - -  -d ","
1,2
3,4
5,6
7,
$
Cool but what about a real life example. Let's say we want to create a nice table like list of our OCI Autonomous Databases. The command to get that would be:
$ oci search resource structured-search --limit 1000 --query-text "query AutonomousDatabase resources return allAdditionalFields where lifecyclestate != 'TERMINATED'" |
$
This would generate a JSON with tons (too much) of information and JSON is not really human readable. We could then first use jq to only get the information we are interested in:
$ oci search resource structured-search --limit 1000 --query-text "query AutonomousDatabase resources return allAdditionalFields where lifecyclestate != 'TERMINATED'" | jq -r '.data.items[] | ."additional-details".dbName,."additional-details".ecpuCount,."additional-details".workloadType, ."additional-details".dataStorageSizeInTBs,."lifecycle-state", (."time-created" | gsub("[.][0-9].*$";""))'
PROD2
32.0
ATP
8
AVAILABLE
2024-09-02T07:49:32
PROD1
64.0
ADW
0
AVAILABLE
2023-12-06T02:20:58
TEST1
48.0
ADW
0
AVAILABLE
2023-11-29T02:07:21
$
We indeed get the information we need but it is not really readable. I guess you already guessed how to make it readable: paste! We have 6 values per Autonomous Database, so just use 6 hypens in the paste command:
$ oci search resource structured-search --limit 1000 --query-text "query AutonomousDatabase resources return allAdditionalFields where lifecyclestate != 'TERMINATED'" | jq -r '.data.items[] | ."additional-details".dbName,."additional-details".ecpuCount,."additional-details".workloadType, ."additional-details".dataStorageSizeInTBs,."lifecycle-state", (."time-created" | gsub("[.][0-9].*$";""))' | paste - - - - - -
PROD2        32.0    ATP     8       AVAILABLE       2024-09-02T07:49:32
PROD1        64.0    ADW     0       AVAILABLE       2023-12-06T02:20:58
TEST1        48.0    ADW     0       AVAILABLE       2023-11-29T02:07:21
$
Oh, this is very better! One would tell me that we can also do that using jq using join or @tsv and you would be correct but paste will work with non JSON outputs.

You also know that you can easily add a -d "," to get that output in CSV but let's keep it text based as I want that list from my terminal on my VM quickly when I need it and I would like that output to be nicer. This is where column comes into play! column makes nice columns (adapting the size of the columns) from outputs and can also add some nice column separators to look like a table (I won't re show the whole long oci | jq command for viibility):
$ oci search . . . | paste - - - - - - | sort | column -t -o " | "
PROD1 | 64.0 | ADW | 0 | AVAILABLE | 2023-12-06T02:20:58
PROD2 | 32.0 | ATP | 8 | AVAILABLE | 2024-09-02T07:49:32
TEST1 | 48.0 | ADW | 0 | AVAILABLE | 2023-11-29T02:07:21
$
column can also add a header for each column:
$ oci search . . . | paste - - - - - - | sort | column -t -o " | " -N "DBName,ECPU,Type,TBs,Status,TimeCreated"
DBName | ECPU | Type | TBs | Status    | TimeCreated
PROD1  | 64.0 | ADW  | 0   | AVAILABLE | 2023-12-06T02:20:58
PROD2  | 32.0 | ATP  | 8   | AVAILABLE | 2024-09-02T07:49:32
TEST1  | 48.0 | ADW  | 0   | AVAILABLE | 2023-11-29T02:07:21
$
Last but not least, it is also easy to hide columns; let's hide the ECPU (column2) and the TBs (column 4) numbers (by the way, I contacted support as the TBs for my ADW is 0 which looks like a bug):
$ oci search . . . | paste - - - - - - | sort | column -t -o " | " -N "DBName,ECPU,Type,TBs,Status,TimeCreated" -H2,4
DBName | Type | Status    | TimeCreated
PROD1  | ADW  | AVAILABLE | 2023-12-06T02:20:58
PROD2  | ATP  | AVAILABLE | 2024-09-02T07:49:32
TEST1  | ADW  | AVAILABLE | 2023-11-29T02:07:21
$
Super cool and super easy!

Now, let's get back to another good combo using paste. We sometimes need to anonymize data (when writing a blog for example) and this can be a bit painful; what if we could have a tool automatically shuffling the characters of what we want to anonymize for us? Let's go back to our sequence of 7 numbers I opened with and we let's use the shuf command which will shuffle the lines of this output:
$ seq 1 7 | shuf
4
7
2
5
1
6
3
$
We now automatically recognize the kind of input which can be serialized by paste; let's do it:
$ seq 1 7 | shuf | paste -s -d ''
1547362
$
Note: the output is always different as shuf will shuffle the data differently each time it is executed. This is very cool, we now just need to find something which transform a list of characters to one character per line (indeed, we won't use seq but real data to be anonymized); a kind of unpaste command; as usual, those crazy Unix creators thought about everything and this command is... fold which wraps lines up to a number of character which we can set to 1 for our need:
$ echo "1234567"
1234567
$echo "1234567" | fold -w 1
1
2
3
4
5
6
7
$
We now have the combo we wanted:
$ echo "1234567" | fold -w 1 | shuf | paste -s -d ''
5347162
$ echo "1234567" | fold -w 1 | shuf | paste -s -d ''
3746215
$ echo "1234567" | fold -w 1 | shuf | paste -s -d ''
7253416
$
You have here a string anonymizer; if you use that on an OCID for example:
$ echo "anuwcljt6ubcb2aa6hv52fnv343cvqhvwit7fedl4q7beqd2gw2fkhr4mhma" | fold -w 1 | shuf | paste -s -d ''
4cqah43jdkv23uqu2l22thmlwvrbqbawhnf4ncevewfgh5f6atmb7dvc6i7a
$
Well, good luck to find the original one back!

And all of this for ~ 100 KB:
$ du -sh /usr/bin/shuf
48K     /usr/bin/shuf
$ du -sh /usr/bin/fold
36K     /usr/bin/fold
$ du -sh /usr/bin/paste
36K     /usr/bin/paste
$
Now that you've learnt how to make some cool combos with paste, fold, shuf and column, ask the below question to your colleagues:


That's all for this one; enjoy and... keep it simple!
< Previous shell tip / Next shell tip coming soon >

Some bash tips -- 17 -- SECONDS

This blog is part of a shell tips list which are good to know -- the whole list can be found here.

Reinventing the wheel is rooted deep inside our DNA. I really try to never reinvent the wheel but I recently got caught (!).

Indeed, when I wanted to know how fast / how slow something was running or just to log the time spent by a script running, I used to write it like that:
start=$(date +%s)                                          <== Epoch seconds
do_something                                               <== Something is running
end=$(date +%s)                                            <== Epoch seconds
echo "Time spent: $(( end-start )) seconds"                <== Difference between number of sec when do_something ends and when it started

Lets try it with a simple sleep as "do_something":
$ start=$(date +%s); sleep 2; end=$(date +%s); echo "Time spent: $(( end-start )) seconds"
Time spent: 2 seconds
$

This looks obvious and straightforward and I honestly never thought there would be an easier way (and this is why I never looked for it !). And that better way is a magic bash variables named SECONDS. SECONDS counts the number of seconds since your shell is invocated and you can reset it to 0 when you wish and then make it count whatever you want for you (!) -- meaning that the above code would now be:
SECONDS=0                                                  <== Reset SECONDS to 0
do_something                                               <== Something is running
echo "Time spent: $SECONDS"                                <== Show the time spent by do_something

Which does exactly what we want it to do in a very simple way:
$ SECONDS=0; sleep 2; echo "Time spent: $SECONDS"
Time spent: 2 seconds
$

Note that this does not work if you expect milliseconds; you'll then have to use the first method using date +%s%3Nto get milliseconds:
$ start=$(date +%s%3N); echo "" > /dev/null ; end=$(date +%s%3N); echo "Time spent: $(( end-start )) milliseconds"
Time spent: 3 milliseconds
$

One less opportunity to reinvent the wheel!
< Previous shell tip / Next shell tip >

Load 2 billion rows with SQL LOADER

I worked on few Extract data / transform data (nor not) / load data into an Oracle database projects during my professional life and SQL Loader has always been my tool of choice when it comes to loading data into an Oracle database; indeed:
  • It is simple
  • It is fast
  • It natively supports CSV intput files
  • It is default so it is available with every Oracle client/instant client, no need to install any extra stuff

Having said that, I recently ran into kind of a challenge when the number of rows to load were 1.7 billion (1,700,000,000) -- sorry for the click bait title with 2 billion but round numbers talk better to people :)
$ wc -l 2bill_load.csv
1704431835 2bill_load.csv
$ du -sh 2bill_load.csv
665G    2bill_load.csv
$

Before jumping into this, please note that all of this has been achieved using the below configuration:
When loading this file into the target ADB using SQL Loader, it took 9h33 hours
$ sqlldr userid="user/password@service" control=mycontrol.sql direct=true etc...
. . .
Total logical records read:      1704431835
Elapsed time was:     09:33:50.10
CPU time was:         02:42:12.76
. . .
$

When you do the maths, it is actually not that bad:
  • 1.7 billion rows in 9h33
  • 179 million rows per hour
  • 6,827,309 million rows per minutes
  • 113,788 rows per seconds

But the whole picture is kind of slow so I looked for a workaround idea and found that very cool SQL Loader option:
Note that this option is not like "load this big file using X parallel process"; it is to load different input files in parallel and parallel=true is to let SQL Loader know that you are loading X files into the same table in parallel.

I actually didn't have 1 big file but I had around 200,000 files, the sum being 1.7 billion rows so this parallel option was exactly what I was looking for. I just had to write a simple parallel execution as below:
L_LOAD_PARALLEL=16                                                             # Parallel degree
           l_nb=0                                                              # A counter
     l_nb_files=$(find . -type f -size +0 | wc -l)                             # Number of files to load
for F in $(find . -type f -size +0); do
    ((l_nb++))
    sqlldr userid="user/password@service" control=mycontrol.sql direct=true data="${F}" parallel=true etc... &
    if ! ((l_nb%L_LOAD_PARALLEL)); then
        echo "Max parallel degree of ${L_LOAD_PARALLEL} reached; waiting. . ."
        echo "INFO" "Files loaded: ${l_nb}/${l_nb_files}"
        wait
    fi
done
wait
And by just running this load with a parallel of 16, the whole load only took 3 hours (knowing that I also removed potential duplicate rows in each file during this process) -- pretty cool right ! Depending on your VM and the shared load on that VM (I didnt push too much that // degree as the VM I used has other activity running on it which I didnt want to disrupt), you could run with more parallel degree to speed that up even more.

If you have 1 big file with so many rows, you will have to split that file in smaller files before; below an example with a 100 million rows file splitted into 50 MB files:
$ wc -l 100_mill_file.csv
100000000 100_mill_file.csv
$ du -sh 100_mill_file.csv
40G     100_mill_file.csv
$ time split -b 50000000 100_mill_file.csv --additional-suffix ".dat"   <== split in 50MB files
real    0m44.538s           <== 44 seconds
user    0m0.094s
sys     0m13.751s
$ ls -ltr
total 779134832
-rw-rw-r--. 1 opc opc  41974611834 Mar 18 10:22 100_mill_file.csv
-rw-rw-r--. 1 opc opc     50000000 Mar 18 10:24 xaa.dat
-rw-rw-r--. 1 opc opc     50000000 Mar 18 10:24 xab.dat
-rw-rw-r--. 1 opc opc     50000000 Mar 18 10:24 xac.dat
-rw-rw-r--. 1 opc opc     50000000 Mar 18 10:24 xad.dat
. . .
$ du -sh xaa.dat
48M     xaa.dat
$ ls -ltr x*.dat | wc -l
840
$
Note that SQL Loader requires a file extension thus the --additional-suffix ".dat".

That's all for this one, enjoy the SQL Loader power!

Some shell tips -- 14 -- rev

This blog is part of a shell tips list I find useful to use on every script -- the whole list can be found here.

In the situational Unix/Linux commands family, one would most likely be on top of the list: rev. Indeed, rev has no option and does one and unique thing: it reverse characters. Let's have a look at an example:
$ echo "abcdef" | rev
fedcba
$
It also works with files:
$ rev afile.txt
1 enil elifa
2 enil elifa
$
And with heredocs as well:
$ cat << EOF | rev
heredoc line 1
heredoc line 2
EOF
1 enil codereh
2 enil codereh
$
And the result is even more interesting when using tac instead of cat
$ tac << EOF | rev
heredoc line 1
heredoc line 2
EOF
2 enil codereh
1 enil codereh
$
I would not argue that this is useful on a daily basis though :) You can use rev to sort a list by the last character:
 $ cat << EOF | rev | sort | rev
file1.txt
file2.log
file3.csv
EOF
file2.log
file1.txt
file3.csv
$
You could also use rev to have the last character of a strong in uppercase for example by using an extra variable and variable substitution:
$ VAR=$(echo "abcdef" | rev)
$ echo "${VAR^}" | rev
abcdeF
$
But to be fair we could also do this with sed:
$ echo "abcdef" | sed 's/.$/\U&/'
abcdeF
$
And if you would like to upper case the first and the last character of a string, you would do it as below:
$ echo "abcdef" | sed -e 's/\(^.\)\(.*\)\(.$\)/\U\1\L\2\U\3/'
AbcdeF
$
But this is another story :)

To sum up, you will most likely not use rev on a daily basis but it is still a command worth to know as you will need it one day for sure!


< Previous shell tip / Next shell tip >

Some shell tips -- 13 -- tac

This blog is part of a shell tips list I find useful to use on every script -- the whole list can be found here.

Improving in coding with a language also means widening your culture around this area to be able to find an easy way to do something complicated the day this challenge comes. This is why I would like to talk about tac today.

Everyone knows the cat command which prints one or more files to the standard output. tac, thus its name, does the opposite. So no, the opposite of printing a file to the standard output is not UN-printing a file to the standard output nor NOT printing a file to the standard output, it is printing a file to the standard output in reverse.

Let's say we have the below logfile we can print on the standard output using cat:
$ cat logfile
Start of patching 1     <== Start of patching session 1
many things happened here
Exit status:0; End of patching 1

Start of patching 2     <== Start of patching session 2
many things happened here as well; some failed
Exit status:123; End of patching 2
$
With tac we would have:
$ tac logfile
Exit status:123; End of patching 2
many things happened here as well; some failed
Start of patching 2     <== Start of patching session 2

Exit status:0; End of patching 1
many things happened here
Start of patching 1     <== Start of patching session 1
$
See? the output is in reverse. This is when you should be starting asking yourself "ok great but what is the use of that ?".

If we continue with this patching logfile example, we can see that the new patch sessions logs are appended to this logfile and you would be most likely interested by the latest patch session and return code and here is where tac makes it very easy compared to have to get the latest patch logs reading the logfile from the top:
$ tac logfile.log | awk '{print $0; if ($1 ~ /^Start/) {exit}}'
Exit status:123; End of patching 2
many things happened here as well; some failed
Start of patching 2
$
For those unfamiliar with awk, this one prints the lines as they are (print $0) and exits when it finds a line starting with Start (if ($1 ~ /^Start/) {exit}). Easy ! (again, try to think to code the same thing reading the file from the top). The only issue now is that the logs are sent in reverse as a feature of tac but we would like to have them on the correct order -- so just tac the output !
$ tac logfile.log | awk '{print $0; if ($1 ~ /^Start/) {exit}}' | tac
Start of patching 2
many things happened here as well; some failed
Exit status:123; End of patching 2
$

Another point to mention is that tac uses end of line as a default separator but you can change this (with -s or --separator) to reverse some list of strings for example:
$ A=$(echo "10;11;12;13;14;" | tac -s ";")
$ echo $A
14;13;12;11;10;
$
The separator can also be a regexp with -r or --regex (let's say your csv can also have comma as a separator on top of semi-column):
$ A=$(echo "10,11;12,13;14;" | tac -r -s "[,;]")
$ echo $A
14;13;12,11;10,
$
Note that if the last field of your csv like variable has no separator, tac will make it a space:
$ A=$(echo "10,11;12,13;14" | tac -r -s "[,;]")  <== no "," nor ";" after 14
$ echo $A
14 13;12,11;10,  <== tac puts a space after 14
$


tac is part of some lesser known Unix/Linux commands. For sure tac is situational but yet easy and powerful which is exactlty what we want ! If, like me, you have experienced some badly implemented moniroting tools re opening tons of old tickets for old alerts because "oh yes the agent has restarted so it is re scanning the whole logfile", maybe a simple knowledge of tac could have saved tons of hours to people closing these useless tickets after an agent restart just by reading the file from the bottom and at least stop at the first occurence of the error pattern found :)


< Previous shell tip / Next shell tip >

Some bash tips -- 12 -- Variables Manipulation

This blog is part of a bash tips list I find useful to use on every script -- the whole list can be found here.

Now that we know how and why we need to protect and quote our variables in bash, it is now time to explore some more advanced Variables Manipulation techniques which are basically powerful stuff which can happen between these bash curly brackets (aka braces): {}. But hang on, it is not just a cool stuff we can use to look geek, it is also an incredible way of making our code far more performant and scalable.

Variable length

A first thing we can do is to know the length of a variable by using # in front of the name of the variable inside the curly brackets:
$ var="12345678"
$ echo "${#var}"
8
$ if [[ "${#var}" -gt 7 ]]; then echo "This is a very long variable !"; fi
This is a very long variable !
$

Variables Trimming

We can also very easily trim a variable with :position:length; for example, to only show the first character of a variable:
$ echo "${var}"
12345678
$ echo "${var:0:1}"
1
$ echo "${var::1}"  <== the "0" can be ignored
1
$
And using the same principle, you can use a negative value to start from the end of the variable:
$ echo "${var::-1}"
1234567    <== remove the last character
$ echo "${var:2:-2}"
3456       <== remove the 2 first characters and the 2 last ones
$
And let's say you are interested in the 2 first and the 2 last characters and not in anything in between:
$ size="${#var}"
$ echo "${var:0:2}${var:$size-2:2}"
1278
$

Variables Replacement

The syntax ${var/pattern/replacement} can be used to easily replace a pattern in a string; and a double slash would be used for a global substitution ${var//pattern/replacement}:
$ var="ABcd----ABcd----ABcd"
$ echo "${var/B/Z}"
AZcd----ABcd----ABcd  <== simple substitution here, only the first B has been replaced by Z
$ echo "${var//B/Z}"  <== note the double shash // here
AZcd----AZcd----AZcd  <== global substitution here, all the B have been replaced by Z
$
If we want to replace only what starts or ends a variable, we would use ${var/#pattern/replacement} and ${var/%pattern/replacement}; let's see a couple of examples:
$ echo "${var/#A/Z}"
ZBcd----ABcd----ABcd  <== Starting A has been replaced
$ echo "${var/%d/Z}"
ABcd----ABcd----ABcZ  <== Ending d has been replaced
$
There is no Regular expressions here but extglob which stands for extended globbing and which has a different syntax than regexp but it is easy to catch up with this syntax (I found this blog clear on the subject):
$ echo "${var//[Ad]/Z}"
ZBcZ----ZBcZ----ZBcZ
$ echo "${var//B?/Z}"
AZd----AZd----AZd
$ var="00000000012340000000"
$ echo "${var/#+(0)/}"
12340000000      <== Remove the leading zeros
$ echo "${var/%+(0)/}"
0000000001234    <== Remove the trailing zeros
$

Uppercase and Lowercase

Another thing I use a lot especially when getting parameters from the command line through getopt[s?] is upper and lowercase; the easy syntaxes ,, ,,, ^ and ^^ are used for this purpose:
$ VAR="ABCD"
$ echo "${VAR,}"
aBCD  <== first character in lowercase
$ echo "${VAR,,}"
abcd  <== all the characters in lowercase
$ var="abcd"
$ echo "${var^}"
Abcd  <== first character in uppercase
$ echo "${var^^}"
ABCD  <== all the characters in uppercase
$

Performances and scalability

I know what you think at this point: "ok Fred this is cool but this is many new syntaxes to learn and I can already do all of that with sed, awk or tr as I have always been doing !"
As an example is worth 10k words, let's use a simple lowercase example to see if learning all of these syntaxes are worth it or not (note that there maybe other ways to lowercase a variable, these ones are the ones I see the most often):
$ A="ABCD"
$ time echo "${A,,}"
abcd
real    0m0.001s   <==
user    0m0.000s
sys     0m0.000s
$ time echo "${A}" | tr '[:upper:]' '[:lower:]'
abcd
real    0m0.017s  <==
user    0m0.008s
sys     0m0.005s
$ time echo "${A}" | awk '{print tolower($1)}'
abcd
real    0m0.075s  <==
user    0m0.008s
sys     0m0.042s
$
This is still small times, so no big deal ? well, let's do that 10k times:
$ time for i in $(seq 1 10000); do echo "${A,,}" > /dev/null; done
real    0m0.352s  <==
user    0m0.285s
sys     0m0.066s
$ time for i in $(seq 1 10000); do echo "${A}" | tr '[:upper:]' '[:lower:]' > /dev/null; done
real    0m46.088s  <==
user    0m39.311s
sys     0m18.098s
$ time for i in $(seq 1 10000); do echo "${A}" | awk '{print tolower($1)}' > /dev/null; done
real    1m8.847s  <==
user    0m50.360s
sys     0m29.844s
$
This now seems to be very much of a big deal, right? from a third of a second with the ${A,,} syntax to more than 1 minute for awk! And look at that system footprint, the difference is huge!

If a 10k loop to lowercase a variable is not very realistic to you, imagine a script using 10 variables, trimming pieces of variables, removing leading zeros or leading spaces, putting some variables in lowercase, some in uppercase and that script is executed on 1000 servers.. this looks more realistic, right?

Then the global system footprint, the worse performances and the non scalability of tr or awk by non using these simple bash variables manipulation features woul be a real performance killer and if you think about it, more system resources = more electricity used which would also make you partly responsable of the Global Warming! :)

So jump on your keyboards and modify your scripts to uses these bash variables manipulation features to reduce Global Warming!


< Previous shell tip / Next shell tip >

rac-status.sh: what's new ?

This post is a simple rac-status.sh What's new ?. I always track what new feature has been dev or fixed in the code itself, you can also check my github repo log but a dedicated post allows to be more verbose as some topics need more explanations to be fully clear (I have started this what's new in July 2021, previous information are only available in the code / git log).

This post comes on top of the main rac-status.sh feature description post and the rac-status.sh: FAQ.

- May 26th 2025: GI 23.8 (patch 37689703, April 2025) seems to have introduced the fact that NLS_LANG now impacts the output of crsctl which was creating a display issue of the status of the cluster for the users not using english as default language. Also because my regexp managing this was bad. It is now fixed with a better regexp. Thanks to Yoann for reporting this!

- June 29th 2024: Thanks to Nikolay who raised this issue; I could adapt rac-status to 2 node Flex clusters. Indeed, Flex clusters always have a minimum of 3 ASM instances and one of them stays OFFLINE forever as 2 node clusters only have 2 nodes; below an example:
NAME=ora.ASMNET1LSNR_ASM.lsnr
TYPE=ora.asm_listener.type
LAST_SERVER=dbnode01            <== first node
STATE=ONLINE                    <== ONLINE
TARGET=ONLINE
CARDINALITY_ID=1
LAST_RESTART=0
LAST_STATE_CHANGE=0
INSTANCE_COUNT=3

TYPE=ora.asm_listener.type
LAST_SERVER=dbnode02
STATE=ONLINE
TARGET=ONLINE
CARDINALITY_ID=2
LAST_RESTART=1718602026
LAST_STATE_CHANGE=1718602026
INSTANCE_COUNT=3
TYPE=ora.asm_listener.type
LAST_SERVER=dbnode01            <== first node again, this is the 3rd ASM instance required by Flex
STATE=OFFLINE                   <== OFFLINE
TARGET=ONLINE
CARDINALITY_ID=3
LAST_RESTART=0
LAST_STATE_CHANGE=0
INSTANCE_COUNT=3
See in orange the dbnode01 information are shown a second time and it shows an OFFLINE status. This is the 3rd OFFLINE forever Flex ASM instance. What is confusing is that LAST_SERVER is one of the node (dbnode01 here) even if this resource will never be started (and has never been started ?). Also see INSTANCE_COUNT=3 (which is greated than the number of nodes) and CARDINALITY_ID which goes up to 3. Anyway, I have adapted rac-status not to consider this 3rd OFFLINE forever Flex ASM instance any more.

- Feb 22nd 2024:
  • rac-status is tested and validated against GI 23c, you can now upgrade your GI ! :)
  • Fixed an old bug with the Long Names, it works well now with no -L option
  • You can now only show the services (-ns); before you also had to show the databases; it is no more the case
  • A big thanks to Fernando, Yoann, Angel and an anonymous contributor of the blog for testing all of this!
- March 7th 2023:
  • A better -C option and more details about how this option works in the FAQ
- January 31st 2022:
  • Fixed a bug where standbys databases got a red color like if the TARGET was not like the STATE. I discovered that GI always have STATE=INTERMEDIATE for standby databases so after digging into it, I now moved to use USR_ORA_OPEN_MODE instead which fixes the standby issue and also make the coloring more accurate for databases. The USR_ORA_OPEN_MODE does not seem to be implemented for PDBs in 21c (yet ? ). I'll change it for PDBs as well if Oracle implements it in the future.
  • Created a rac-status.sh: FAQ and this what's new page on top of the main rac-status.sh feature description post for more clarity.
- November 11th 2021:
  • Performance improvement using the -attr option of crsctl, x10 faster on systems with 100th of resources registered in the cluster (more details about how I did this in this post)
  • rac-status.sh is now under the GPLv3 licence (same for all the scripts in my git repo); indeed, as rac-status.sh and my other scripts are widely used, it makes the use of them officially free and open source for everyone
- October 20th 2021:
  • RH 6 / OEL 6 (Exadata < 19) ships gawk 3.1.7 (released in 2009 !) which does not support the code I wrote to show the PDB status which requires gawk 4 (released in 2012; not 2021, 2012 !). As RH6/OEL6 is really used less and less and should eventually not be used any more in a near future, I was not very keen on redevelopping this feature for a close to death system so instead, I kept a version for gawk < 4 (RH6/OEL6); you'll find it here.
- September 12th 2021:
  • Implement the new GI 21c feature which allows the PDB management with srvctl to manage the PDBs with srvctl status; also a -p option to show/hide PDBs, default is we show the PDBs; for GI <= 21c which is what everyone is still running on production at this time, nothing changes, no PDB are shown in the Database table
  • The feature does not seem fully implemented by Oracle in term of metadata yet, we can only know if a PDB is Online or Offline but we dont have the info (STATE_DETAILS) if the PDB is Read Write or Read Only. I assume this will be added eventually -- I'll add it once available.


- August 25th 2021:
  • Added the PDB associated to the services (the PDB status is not shown as only GI 21c should have this information)
  • New -D option to specify a list of DB to show (and not the others)
  • New -S option to specify a list of services to show (and not the others)
  • The VIP IPs are not also shown on the right of the table
- July 14th 2021:
  • In some rare occasions, the cluster seems to show the ORACLE_HOMEs in a random order creating issues for the rac-mon.sh users; this ORACLE_HOME list is now alphabetically sorted which fixes this issue
  • For better visibility, all STANDBY resources (instances and services of STANDBY types) and now in blue, the PRIMARY resources still in the default white color
  • On top of this, if a STANDBY service is Online on a PRIMARY instance, it now appears with a red Online as a STANDBY service is not supposed to be running on a PRIMARY standby; same for a PRIMARY service on a STANDBY. Also, an Offline STANDBY service on a PRIMARY database now appears in green Offline as it is how it is supposed to be
  • The CRS environment is now set using /etc/oracle/olr.loc (thanks OzZyHH !) by default and no more /etc/oratab
  • ADVM devices are also shown on the right of the tech table (before, only the ACFS FS were)
  • The -k option also shows the ADVM devices on the same line as the ACFS FS which is handy when you need to remount some, right Kosseila ? :)
  • The -K option hides the ACFS FS and the ADVM devices if you are not interested
  • The cluster upgrade state is now shown to easily detect if your last GI patching has been successful or not:

rac-status.sh: FAQ

rac-status.sh has been widely used in the last years and I am often contacted for various questions thus this below FAQ to make it easier for everyone. This comes on top of the rac-status.sh features description post and the rac-status.sh what's new post.
  • What is rac-status.sh ?
  • rac-status.sh is a bash script showing the status of an Oracle Grid Infrastructure configuration resources (DB, Listeners, Services, PDBs (if GI >=21c), technical resources as well). You can find detailed information and screenshots here.

  • Is rac-status.sh an official Oracle tool?
  • No. I joined Oracle as an employee in 2022. I dev rac-status.sh far before I joined Oracle and my job at Oracle is different. rac-status.sh is something I do on my own on my free time. rac-status.sh is not an Oracle official tool.

  • Is it free to use rac-status.sh ?
  • rac-status.sh is totally free and under the GPLv3 licence. You can use it for free for professionnal needs as you would use any other software under GPLv3 like the tons of tools available on the Linux distribution you use on a daily basis.

  • Where can I get rac-status.sh ?
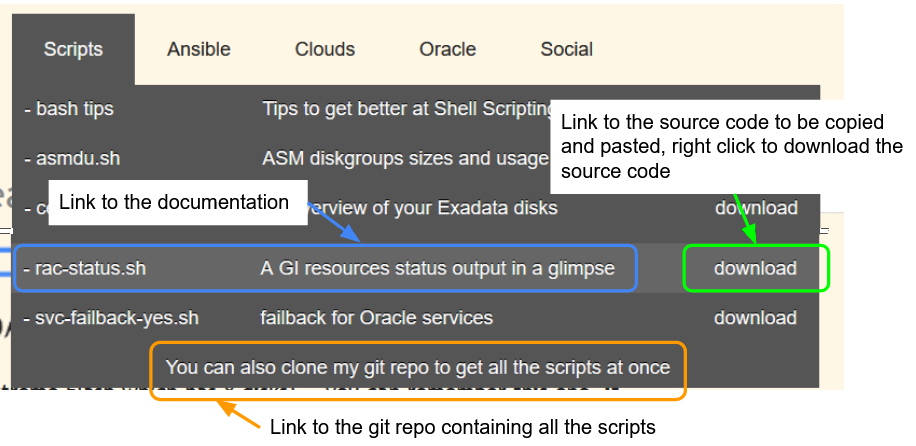
  • The lastest version is always in my git repo which you can clone and pull as much as you want. You can also get the source code (this is also true for all the other scripts I dev, maintain and share) from the Scripts menu on top of each page as shown below:


  • How do I run rac-status.sh ?
  • Ensure it is executable and just ./ it:
    $ chmod u+x rac-status.sh
    $ ./rac-status.sh


  • Which user should I use to run rac-status.sh ?
  • root or oracle; both work.

  • Are there some pre-requisites ?
  • rac-status.sh can read information from Oracle Grid Infrastructure from version 11g; I have also recently implemented the PDB information which is a new GI 21c feature so we can assume that it runs on pretty much any GI version out there.

    One thing though is that when I have developped the PDB support (GI 21c new feature), I have used awk (gawk) multidimensionnal arrays which is a "new" feature introduced with gawk 4 which has been released in 2012 (yes, 10 years ago). Unfortunately, it seems that RH6/OEL6 ships gawk 3.1.7 released in ... 2009.

    So the version supporting the PDBs for GI 21c creates a syntax error on old systems like RH6/OEL6. As RH6/OEL6 should die soon (Oracle 19 pre-requisites is RH7/OEL7), I haven't redevelopped this part but instead kept a version for RH6/OEL6 which you can find here. Also in the Scripts menu under the name rac-status-rh6.sh.

  • Does rac-status.sh also work with Oracle Restart ?
  • Yes.

  • How does rac-status.sh get the information it shows ?
  • rac-status.sh collects information from the GI using crsctl commands (you can check the code itself to see what is done exactly, also this post may be of interest about crsctl syntax and optimization).

  • is rac-status.sh intrusive ? does it modifies something on my system ?
  • No. rac-status.sh just reads information from GI and makes a nice table depending on the options choosen.

  • How can I know which options are available ?
  • Use the -h option:
    $ ./rac-status.sh -h
    Alternatively, you can also check the the rac-status.sh features description post which showcases the options in a detailed manner and also shows some screnshots.

  • Does rac-status.sh support long options ? (--help instead of -h)
  • No. I wrote many scripts supporting long options and there are still OS like Solaris and AIX not fully/correctly supporting long options (not having the same getopt command as Linux).

    So as rac-status.sh is very well spread, I wouldn't want to break it for these guys (they already have to work with these dinosaur OS, they do not need more trouble in their life :p).

  • Which OS are supported ?
  • I develop on Linux (Exadata mainly) and guys using Solaris, AIX or HP-UX haved contacted me over the time when something was not working on their OS. I now roughly know what is not working on Solaris or AIX so I naturally accomodate so rac-status.sh is 100% running on Linux (see above, there is a dedicated version for RH6/OEL6) and should be all good on the other Unixes with Oracle on it. If not, let me know and I'll fix it.

  • Could you please clarify the -C option?
  • From rac-status.sh -h:
    -C    Use the string provided to -C to shorten the hostnames if the default shortening method does not suit you. By default, we remove everything before
          a "db" pattern in the hostnames (dbproddb01 becomes db01); if your hosts do not contain "db" in their names, use -C to shorten as you wish.
          As an example, if your hosts are named oracleprod01, oracleprod02, etc... using -C oracle would shorten the names to prod01, prod02, etc...
    This may need some more clarification though:

    When I started to dev rac-status.sh, all my clients had this kind of naming convention:
    • Cluster name: crsprd
    • DB nodes: crspdrdb01, crsprddb02, etc...
    • Cells: crsprdcel01, etc...
    So to shorten the names (which I did because big clusters didnt fit in my screen and for visibility), I started to remove everything which was before "db" in the DB nodes names which was at that time the cluster name. Now that many many many people use rac-status.sh, came more cases:
    • some people have cluster names with a name which is totally different than the DB nodes or the cells
    • some people have DB nodes without "db" in their names

    This is for this purpose that I introduced the -C option to basically enter a "fake cluster name" or a "custom cluster name" which is not really the name of the cluster but the part you want to remove from the names of your DB nodes.

    So the algorithm is as below:
    • option -L: you do not want to shorten your names => we do not do anything special, long names are used and shown
    • - not -L: we want the short names:
      • 1/ if no -C is specified, we remove everything before "db" to shorten the names => dbproddb01 will become db01 (but the cluster name shown in the header comes from "olsnodes -c" and is not changed at all, this is the real name of your cluster)
      • 2/ if -C is specified we remove this value from the DB nodes as kind of "fake cluster name" like if it was the naming convention I described earlier

  • I found a bug, what should I do ?
  • You can fix it yourself and make a pull request on my git repo, you can also contact me (Linkedin chat, email) or post a comment in the rac-status.sh post and I'll fix it. Please read What information should I provide for you to investigate a bug ? before contacting me to help speeding up the resolution.

  • What information should I provide for you to investigate a bug ?
  • Run rac-status.sh with the below options:
    # ./rac-status.sh -a -o fileforfred.txt
    
    And send me this fileforfred.txt file with the description of the issue.

  • I would like a new feature, what should I do ?
  • Please check using the -h option that it does not already exist; if not, please follow the same procedure as for a bug.

  • How long does it take to have a new feature or a bug fixed ?
  • Keep in mind that this is not my job, I do all this blog and script dev/maintenance/sharing during my extra time. I always try to be as responsive as possible but I have to work for my employer first (you know, to pay a mortgage, buy shoes to the kids, stuff like that :)). I always do my best on that regards though !

  • I have a question not listed here !
  • Just post it in the comment below and I'll add it to this list !

nfs-status.sh: quickly check and fix NFS

NFS are a very cool feature, no doubt about that. But NFS reliability is more questionable and a hung NFS is not easy to spot and can have dramatic consequences by creating a huge load on your system which may eventually die. Also, depending on how/who manages your systems, you may eventually find mounted NFS not in fstab (which will then not be remounted at boot) or unmounted NFS even if they are correctly declared in fstab.

As responsible of the systems, you want to be able to quickly be able to:
  • Find which NFS is in a hung state
  • Quickly umount these hung NFS
  • Find NFS configuration issues (NFS in fstab but umounted or nounted NFS not in fstab)

This is to achieve these goals that I have dev nfs-status.sh; let's have a look at a first output:
[root@prod01]# ./nfs-status.sh

------------------------------------------------------------------------------
Mount Point   | NFS                               | Status       | in fstab  |
-----------------------------------------------------------------------------
/nfs1         | 10.11.12.13:/nfsserver/nfs1       | Hung         |          |
/nfs2         | 10.11.12.13:/nfsserver/nfs2       | Healthy      |          |
/nfs3         | 10.11.12.13:/nfsserver/nfs3       | Not Mounted  |          |
/nfs4         | 10.11.12.13:/nfsserver/nfs4       | Healthy      |    xxx    |
/nfs5         | 10.11.12.13:/nfsserver/nfs5       | Healthy      |          |
/nfs6         | 10.11.12.13:/nfsserver/nfs6       | Not Mounted  |          |
------------------------------------------------------------------------------
[root@prod01]# echo $?
1
[root@prod01]#
The above output is self-explanatory enough not to have to comment it extensively; you can quickly see that /nfs1 is hung (this is tested with the stat -t command), that /nfs4 it not in fstab and that /nfs3 and /nfs6 are not mounted but should be mounted as they are in fstab.

Also, you can know how many NFS are hung usiong the return code of the script, it here shows that 1 NFS is hung. This makes it easy to check if all NFS are good before starting a maintenance and then not doing the maintenance if a NFS is hing using && and || as below:
# ./nfs-status.sh || exit 123
The script also has options to umount the hung NFS, show the mount command, mount the umounted NFS
  • --show: Show the umount commands to umount the hung NFS
  • --mount: Mount the unmounted NFS
  • --umount: Umount the hung NFS
  • --fstab: For non standard fstab, default is: /etc/fstab


Where to download ?

You can download nfs-status.sh from my public git repo or using the direct link to the source code from the Scripts menu on top of this page.

In case of issue/question, as usual, feel free to post a comment down below, contact me by email or linkedin chat.

I have been using this script for a little while and it has always been a situation it has been very useful !

oraenv++: an easy and powerful tool to set up your Oracle environment

I have never found a really good and portable way of setting up an Oracle/ASM environment. For sure, there is oraenv but it is based on oratab which is a static hardcoded text file and oraenv does not work well (at all ?) with RAC. Some tries to set up aliases to set up their environment but same, it is hardcoded, Oracle uses hardcoded env files in OCI, etc ... All of this works more and less well but it has always seemed a bit clumsy to me and during a recent email discussion I had with Osman, I decided to jump into that challenge to create something better, easier and more efficient than any of these tools and a fews days later was born oraenv++!

Key features

  • oraenv++ reads the environmental information from GI/CRS/Oracle Restart so no hardcoded configuration file is needed; sorry I cannot do anything if you do not have GI/CRS/Oracle Restart
  • oraenv++ sets the ORACLE_SID, ORACLE_HOME, ORACLE_BASE, PATH and can also set the ORACLE_PDB_SID environment variable to be able to directly connect to a PDB (from 18.8)
  • if you do not know the name of the database you want to set the env up, oraenv++ will show you a menu with a list of databases from your configuration to choose from
  • you can also grep and grep -v in the database list of your environment (regexp are supported)
  • GI storing the database names in lowercase regardless of their case, oraenv++ is not key sensitive regarding the database name nor the pattern(s) to grep/ungrep
  • oraenv++ has to be sourced (. oraenv++) and not executed (./oraenv++); I'll eventually write about the differences in my bash tips
  • I have tested it with GI 19c and I see no reason why it would not work from any GI 12c+ (including 21c+); not sure for GI 11g which should not be much around any more these days
  • I have been using oraenv++ for a little while now and I honestly find it


Examples

A first example to simply set up a database environment:
$ . oraenv++ prod12a
Database            : prod12a
ORACLE_HOME         : /u01/app/oracle/product/12.1.0.2/db_1
ORACLE_BASE         : /u01/app/oracle
ORACLE_SID          : PROD12A1
ORACLE_PDB_SID      :
sqlplus is          : /u01/app/oracle/product/12.1.0.2/db_1/bin/sqlplus
$
Here, we have set up the prod12a environememnt with the correct instance name running on the host you are connected to. If you do not want to see this output, you can make it silent:
$ . oraenv++ prod12a --silent
$
or
$ OPP_SILENT=True
$ . oraenv++ prod12a
$
If you do not specify a database name, oraenv++ will list all the databases which have an instance on this host from your GI configuration and show you a menu to choose from (let's go with 6 below):
$ . oraenv++
    Database    SID          ORACLE_HOME
-----------------------------------------------------------------
  1/ asm        +ASM1      /u01/app/19.11.0.0/grid
  2/ dev12a     DEV12A1    /u01/app/oracle/product/12.1.0.2/db_1
  3/ dev12b     DEV12B1    /u01/app/oracle/product/12.1.0.2/db_1
  4/ dev19a     DEV19A1    /u01/app/oracle/product/19.0.0.0/db_1
  5/ dev19b     DEV19B1    /u01/app/oracle/product/19.0.0.0/db_1
  6/ misc1      MISC11     /u01/app/oracle/product/12.1.0.2/db_1
  7/ misc2      MISC21     /u01/app/oracle/product/19.0.0.0/db_1
  8/ test       TEST1      /u01/app/oracle/product/11.2.0.4/db_1
  9/ prod12a    PROD12A1   /u01/app/oracle/product/12.1.0.2/db_1
 10/ prod12b    PROD12B1   /u01/app/oracle/product/12.1.0.2/db_1
 11/ prod19a    PROD19A1   /u01/app/oracle/product/19.0.0.0/db_1
 12/ prod19b    PROD19B1   /u01/app/oracle/product/19.0.0.0/db_1
-----------------------------------------------------------------
Which environment you want to set up ? (CTRL+C for exit)
6
Database            : misc1
ORACLE_HOME         : /u01/app/oracle/product/12.1.0.2/db_1
ORACLE_BASE         : /u01/app/oracle
ORACLE_SID          : MISC11
ORACLE_PDB_SID      :
sqlplus is          : /u01/app/oracle/product/12.1.0.2/db_1/bin/sqlplus
$
If you have many databases, you can narrow the selection down using --grep or --ungrep (acts as a grep -v); note that these 2 options allow mutiple comma separated pattern to be grepped/ungrepped; they also supports regexp -- this is far overkill but it is fun :)
$. oraenv++ --grep prod,dev --ungrep 12
     Database    SID          ORACLE_HOME
-----------------------------------------------------------------
  1/ dev19a     DEV19A1    /u01/app/oracle/product/19.0.0.0/db_1
  2/ dev19b     DEV19B1    /u01/app/oracle/product/19.0.0.0/db_1
  3/ prod19a    PROD19A1   /u01/app/oracle/product/19.0.0.0/db_1
  4/ prod19b    PROD19B1   /u01/app/oracle/product/19.0.0.0/db_1
-----------------------------------------------------------------
Which environment you want to set up ? (CTRL+C for exit)
This could also have been written (just to showcase a regexp :)):
$. oraenv++ --grep 19[ab]$
     Database    SID          ORACLE_HOME
-----------------------------------------------------------------
  1/ dev19a     DEV19A1    /u01/app/oracle/product/19.0.0.0/db_1
  2/ dev19b     DEV19B1    /u01/app/oracle/product/19.0.0.0/db_1
  3/ prod19a    PROD19A1   /u01/app/oracle/product/19.0.0.0/db_1
  4/ prod19b    PROD19B1   /u01/app/oracle/product/19.0.0.0/db_1
-----------------------------------------------------------------
Which environment you want to set up ? (CTRL+C for exit)
It indeed also works with ASM:
# . oraenv++ asm
Database            : asm
ORACLE_HOME         : /u01/app/19.11.0.0/grid
ORACLE_BASE         : /u01/app/oracle
ORACLE_SID          : +ASM1
ORACLE_PDB_SID      :
sqlplus is          : /u01/app/19.11.0.0/grid/bin/sqlplus
#
If you want to direct connect to a PDB, you can also specify one with the --pdb option which will set the ORACLE_PDB_SID variable and you could then directly connect to this PDB (this works from 18.8):
$ . oraenv++ dev19a --pdb MY_PDB
Database            : dev19a
ORACLE_HOME         : /u01/app/oracle/product/19.0.0.0/db_1
ORACLE_BASE         : /u01/app/oracle
ORACLE_SID          : DEV19A1
ORACLE_PDB_SID      : MYPDB
sqlplus is          : /u01/app/oracle/product/19.0.0.0/db_1/bin/sqlplus
$ sqlplus / as sysdba
SQL> show con_name
CON_NAME
----------------
MY_PDB

TODO / other features / Ideas

First of all, feel free to post down below or contact me if you have ideas or remarks.

On my end, one cool feature to implement in a next future would be to list the PDBs per CDB showing a menu to be able to choose from as we have hundreds of PDBs per CDB and we cannot really remember of all them then choosing from a list would be far easier. The thing here is that the PDBs are real GI resource from 21c only, they are listed in the services before 21c which I already use to show them in rac-status.sh. The thing is that crsctl is slow to query all the services when there are a lot of them so this would slow oraenv++
. Having said that, the direct connection to a PDB feature takes few seconds to get connected and ssh in any Cloud I have experienced are also slow verifying your credentials, billing you, etc ... and no one complains about it :)

Where to download ?

You can download oraenv++ from my public git repo or using the direct link to the source code from the Scripts menu on top of this page.

In case of issue/question, as usual, feel free to post a comment down below, contact me by email or linkedin chat.

Enjoy !

Some bash tips -- 11 -- Unleash your shell power with ... "| bash" !

This blog is part of a bash tips list I find useful to use on every script -- the whole list can be found here.

When interviewing someone for a job, I almost always ask the question: "how would you kill thousands of processes on a system ?". I won't list all the "interesting" answers/ideas I had but so many people are stuck being able to quickly achieve this task which, first of all, happens in real life (here for example) and, secondly, needs to be fixed very quickly when it happens and you have no time to kill all these process one by one manually after some weird copy and paste technic using a spreadsheet tool :)

To start with, let's create some processes we want to kill (I will create only 5 for the purpose of this blog to keep the output visible); let's create some processes sleeping and doing nothing but a real case scenario would be to kill all the processes of an Oracle instance, processes locking a NFS to be umounted (output of lsof), etc ...:
$ for i in {1..5}; do (sleep 3600 &) ; done
$ ps -ef | grep sleep | grep -v grep
fred        21     1  0 21:28 tty1     00:00:00 sleep 3600
fred        23     1  0 21:28 tty1     00:00:00 sleep 3600
fred        25     1  0 21:28 tty1     00:00:00 sleep 3600
fred        27     1  0 21:28 tty1     00:00:00 sleep 3600
fred        29     1  0 21:28 tty1     00:00:00 sleep 3600
$
We now have 5 sleeping processes we want to kill and we know that the second column is the process id (in orange in the above output). We could easily kill them one by one manually as there are only 5 but remember that a real life scenario will be closer to thousands of processes.
The first thing to do here is to generate the kill commands; I will use awk for this purpose (with awk, the $2 variable is the second column of the output -- so the PID we want to kill):
$ ps -ef | grep sleep | grep -v grep | awk '{print "kill "$2}'
kill 21
kill 23
kill 25
kill 27
kill 29
$
OK great, now that we have all the kill commands, we have to execute them with ... | bash! Indeed, by piping a command into bash (or sh), they will be executed. Let's try that out.
$ ps -ef | grep sleep | grep -v grep | awk '{print "kill "$2}' | bash
$ ps -ef | grep sleep | grep -v grep
$     <== no more sleep process, they have all been killed !
Powerful, right ? indeed it is !


Just one thing to keep in mind, remember that with great powers come great responsibility, so be very careful and double check that you grep the good processes you want to kill not to kill too much processes !

Enjoy your new powers !


< Previous bash tip / Next bash tip >

Some bash tips -- 10 -- Run a command for a certain amount of time

This blog is part of a bash tips list I find useful to use on every script -- the whole list can be found here.

No doubt, all these guys who created Unix/Linux OS and commands are brilliant. We already saw that something like pausing and restarting a process which look complicated is very easy, now let's have a look at how to run a command for a certain amount of time (how to stop a command after a certain amount of time).
Let's start using sleep as example:
$ date; sleep 20; date
Sun Sep 19 22:27:35 AEST 2021
Sun Sep 19 22:27:55 AEST 2021  <== sleep 20 stopped after 20 seconds as epxected
$
Now let's say we want to stop this sleep 20 comand after 10 seconds; how would you do that ? it does not seem that easy, right ? unless you know the . . . timeout command ! have a look below:
$ date; timeout 10 sleep 20; date
Sun Sep 19 22:36:42 AEST 2021
Sun Sep 19 22:36:52 AEST 2021  <== sleep 20 stopped after 10 seconds !
$
It was easy right ? now let's take a real life example. Let's say you want to run a tcpdump on a port and filter on few IPs, tcpdump generating a very large amount of data (some systems can generate 500+ MB for 1 second), you do not want to run tcpdump for too long. tcpdump is cool enough to provide a -G option to rotate to a new file every -G seconds (-G 1 will rotate the files every 1 second) if the output file specified by the -w option has a timeformat -- below an example to show this:
#  tcpdump -G 1 'port 1521 and (host 10.11.12.13 or host 10.11.12.14 or host 10.11.12.15)' -w $(hostname)-%Y-%m-%d_%H.%M.%S
Explanation:
  • tcpdump -G 1: take a tcpdump and rotate the output file every 1 second
  • port 1521 and (host 10.11.12.13 or host 10.11.12.14 or host 10.11.12.15): tcpdump port 1521 and filter on these 3 IPs
  • -w $(hostname)-%Y-%m-%d_%H.%M.%S: save the output in a file with the hostname and a timestamp (which will be changed every second)
Now that we have understood this, we want to run this tcpdump command for few seconds, let's say maximum a few minutes. So you can manually start it and CTRL-C it when you are done but first of all it is not classy (:D) and what if you need to schedule it ? this is where timeout comes into the game !
# date; timeout 20 tcpdump -G 1 'port 1521 and (host 10.11.12.13 or host 10.11.12.14 or host 10.11.12.15)' -w $(hostname)-%Y-%m-%d_%H.%M.%S; date
Sun Sep 19 14:51:35 AEST 2021
tcpdump: listening on bondeth0, link-type EN10MB (Ethernet), capture size 262144 bytes
xxxxxx packets captured
yyyyyy packets received by filter
zzzzzz packets dropped by kernel
Sun Sep 19 14:51:55 AEST 2021    <== stopped after 20 seconds
#
Here you go, a 20 seconds tcpdump which has generated 20 files containing 1 second each. You want to schedule it in like 2 hours ? open a screen and:
# date; sleep 7200; date; timeout 20 tcpdump -G 1 'port 1521 and (host 10.11.12.13 or host 10.11.12.14 or host 10.11.12.15)' -w $(hostname)-%Y-%m-%d_%H.%M.%S; date
Easy peasy !

Note that timeout works with simple command and you have to use a different syntax if you want to use it with more complex command like for loops, while loops, stuff like that. If we use the for loop I have used in pause/restart a process with timeout, this won't work as is:
$ timeout 6 "for i in {1..100}; do echo \$(date) -- \$i; sleep 2; done"
timeout: failed to run command ‘for i in {1..100}; do echo $(date) -- $i; sleep 2; done’: No such file or directory
$
You have to use the below syntax starting the command in a bash subshell:
$ timeout 6 bash -c "for i in {1..100}; do echo \$(date) -- \$i; sleep 2; done"
Sun Sep 19 23:46:05 AEST 2021 -- 1
Sun Sep 19 23:46:07 AEST 2021 -- 2
Sun Sep 19 23:46:09 AEST 2021 -- 3   <== stopped after 6 seconds as per timeout
$
Or with a script:
$ cat myscript.sh
#!/bin/bash
for i in {1..100}; do echo $(date) -- $i; sleep 2; done
$ timeout 6 ./myscript.sh
Sun Sep 19 23:54:27 AEST 2021 -- 1
Sun Sep 19 23:54:29 AEST 2021 -- 2
Sun Sep 19 23:54:31 AEST 2021 -- 3   <== stopped after 6 seconds as per timeout
$

That's all for this one, enjoy this new jewel !


< Previous bash tip / Next bash tip >

Some bash tips -- 9 -- Pause and restart a process

This blog is part of a bash tips list I find useful to use on every script -- the whole list can be found here.

One day, when I was developing this super scheduler able to schedule and parallelize hundreds of jobs, the project manager came to me and asked me:
- "Would it be possible to have a PAUSE and RESTART button on the website to PAUSE and RESTART a job ?"

I assume that in these situations, we have to do a king of poker face not to show the "whaaaaaaaaaat ? what does this guy want ?" you have in mind at this moment and then start working on this. Having a button on a web page sending a PAUSE or a RESTART action to a script is easy but then... how to do PAUSE and RESTART a process at OS level !?


And, as I will show below, it is surpringly easy as it is a feature already provided by the system ! as we already saw this previously, we use the kill command to send signals to processes; so let's have a look at what is already existing (I won't show all the posible signals below, just the one we want):
$ kill -l
 1) SIGHUP       2) SIGINT       3) SIGQUIT      4) SIGILL       5) SIGTRAP
 6) SIGABRT      7) SIGBUS       8) SIGFPE       9) SIGKILL     10) SIGUSR1
11) SIGSEGV     12) SIGUSR2     13) SIGPIPE     14) SIGALRM     15) SIGTERM
16) SIGSTKFLT   17) SIGCHLD     18) SIGCONT     19) SIGSTOP     20) SIGTSTP
21) SIGTTIN     22) SIGTTOU     23) SIGURG      24) SIGXCPU     25) SIGXFSZ
Hey, look at these 2 signals in orange, SIGCONT for . . . continue and SIGSTOP for . . . stop !

Let's try them out ! firstly, in a first session, let's simulate a process running which will first show its own PID and then a loop showing the date and an increment number every 2 seconds:
$ echo "pid is "$$; for i in {1..100}; do echo "$(date) -- $i"; sleep 2; done
pid is 7   <== pid of the shell, very small as I did this example on my laptop
Mon Sep  6 22:47:31 AEST 2021 -- 1
Mon Sep  6 22:47:33 AEST 2021 -- 2
Mon Sep  6 22:47:35 AEST 2021 -- 3
Mon Sep  6 22:47:37 AEST 2021 -- 4
Then, in another session, let's pause, wait and restart this PID (look at the timestamps):
$ date; kill -STOP 7
Mon Sep  6 22:47:39 AEST 2021
$ date; kill -CONT 7
Mon Sep  6 22:48:01 AEST 2021
$
Now look at the whole output of the process we have paused and restarted:
$ echo "pid is "$$; for i in {1..100}; do echo "$(date) -- $i"; sleep 2; done
pid is 7
Mon Sep  6 22:47:30 AEST 2021 -- 1
Mon Sep  6 22:47:33 AEST 2021 -- 2
Mon Sep  6 22:47:35 AEST 2021 -- 3
Mon Sep  6 22:47:37 AEST 2021 -- 4   <== I paused    at 22:47:39
Mon Sep  6 22:48:01 AEST 2021 -- 5   <== I restarted at 22:48:01
Mon Sep  6 22:48:04 AEST 2021 -- 6
Mon Sep  6 22:48:06 AEST 2021 -- 7
Mon Sep  6 22:48:08 AEST 2021 -- 8
^C <== end of the example, I CTRL_C it to stop
$
We did it, we have paused and restarted a process, congratulations !

Before wrapping up this blog, note that you can indifferently use the name of the kill signal with SIG or not and also the signal number meaning the below are synonyms:
  • kill -18, kill -SIGCONT, kill -CONT
  • kill -19, kill -SIGSTOP, kill -STOP

Another interesting thing to know is that you can know which status a process is in from the operating system, check the below the orange status you can get using a simple ps (below my example has PID = 8):
$ ps -f 8
UID        PID  PPID  C STIME TTY      STAT   TIME CMD
fred         8     7  0 11:48 tty1     S      0:00 -bash
$ kill -19 8  <== pause the process
$ ps -f 8
UID        PID  PPID  C STIME TTY      STAT   TIME CMD
fred         8     7  0 11:48 tty1     T      0:00 -bash
$ kill -18 8  <== restart the process
$ ps -f 8
UID        PID  PPID  C STIME TTY      STAT   TIME CMD
fred         8     7  0 11:48 tty1     S      0:00 -bash
$
This is documented in man ps:
PROCESS STATE CODES
       Here are the different values that the s, stat and state output specifiers (header "STAT" or "S") will display to describe the state of a process:
               D    uninterruptible sleep (usually IO)
               I    Idle kernel thread
               R    running or runnable (on run queue)
               S    interruptible sleep (waiting for an event to complete)
               T    stopped by job control signal
               t    stopped by debugger during the tracing
               W    paging (not valid since the 2.6.xx kernel)
               X    dead (should never be seen)
               Z    defunct ("zombie") process, terminated but not reaped by its parent
You can see that the process is in S status when the process is "doing something" and in a T status when the process is paused.

That's all for this one, enjoy your new powers !


< Previous bash tip / Next bash tip >

OCI: Datapump between 23ai ADB and 19c ADB using database link

Now that we know how to manually create a 23ai ADB in OCI , that we also know how to create a database link between a 23ai ADB and a 19C AD...