Twitter

How to use OCI Gen AI from the Linux command line

OCI Generative AI offers an on-demand service which you can access from your tenancy and pay only for what you use. This is very handy and also ensure that no data goes outside of the company if you were to copy/paste logs into whatever web based LLM. Integrating that capabilty into your daily hands-on work (analyze system state, diagnose issues, generate code, etc...) without ever leaving the terminal is a real productivity booster.
This is why I have developped a function which wraps the OCI CLI Generative AI Inference service that you can source and then call from the command line. You can download the full script from my GitHub repository.
Note that this is not meant to interact with your system, it cannot access your system.


Prerequisites: OCI Setup

Before using the function, you must have the OCI CLI installed and your OCI API keys configured on your system. If you haven't configured API keys yet, check out my step-by-step guide: OCI: Setting up API Keys.


Prerequisites: Compartment ID

You will need to set up your compartment ID inside the function:

DEF_COMP_ID="xxxxxxxxxx"
or export it from the command line before calling the function:
export ENV_COMP_ID="xxxxxxxxxx"
You may also adapt to your region:
export DEF_REGION="yyyyyyy"
or also export it from the command line before calling the function:
export ENV_REGION="us-phoenix-1"


Source the function and a first use

At the time I am writting this blog (Sep-2026), the function is set to use Grok 4.3 -- which can easily be updated into the function as well.
[frdenis@myvm ~]$ source .ai_functions"
[frdenis@myvm ~]$ source .ai_functions"
[frdenis@myvm ~]$ ask_llm "who are you ?"
I'm Grok, an AI built by xAI. I'm here to answer questions, help with problems, and have a bit of fun while doing it. What's up?
[frdenis@myvm ~]$


Storage Pressure Analysis (df)

First example is to check for space pressure on our system by seding the output of df -hto the LLM:
[frdenis@myvm ~]$ ask_llm "has this $(cat /etc/redhat-release) system some space pressure issue ? $(df -h)"
Based on the output, **no critical space pressure** at the moment, but there are a couple of areas worth monitoring:
### Summary
| Filesystem | Usage | Status |
|------------|-------|--------|
| `/` (root) | 61% | Moderate – fine for now |
| `/boot` | 68% | **Highest %** – monitor for kernel updates |
| `/data` | 39% | Healthy |
| `/run` (tmpfs) | 9% (4.1G used) | Using **4.1 GB of RAM** – worth checking |
### Recommendations
1. **`/boot` at 68%**
   This is the most "full" filesystem percentage-wise. If you install new kernels or if old ones aren't cleaned up, you could run into issues during updates. Consider removing old kernels if they're no longer needed.
2. **`/run` tmpfs using 4.1 GB**
   This is in-memory usage. If your system has memory constraints, investigate what's consuming that space:
   ```bash
   du -sh /run/* 2>/dev/null | sort -h
   ```
   Common culprits: large files in `/run/user/*`, container runtime data, or logs written to tmpfs.
3. **Root (`/`) at 61%**
   Not urgent, but if this system generates a lot of logs or temporary data, keep an eye on it.
**Bottom line:** No immediate crisis, but clean up `/boot` and check what's using 4.1 GB in `/run`.


SAR

We can also send the last 7 days of SAR for a quick summary / find potential issues:
[frdenis@myvm ~]$ ask_llm "check if this system has cpu issue, also let me know when are the cpu peaks: $(for i in {1..7}; do sar -u -f /var/log/sa/sa$(date -d "$i days ago" +%d); done)"
**Analysis Summary**
### Overall Assessment
**No significant CPU issue** on this system.
- The system has **16 CPUs** and is very lightly loaded on average.
- Average CPU utilization across all days is only **~10-11%** busy (`100% - 89% idle`).
- `%iowait` and `%steal` are negligible, which is good.
### CPU Usage Pattern
| Metric          | Average | Typical Range | Notes |
|-----------------|---------|---------------|-------|
| **%user**       | ~3.9%   | 0.3 – 24%     | Main driver of spikes |
| **%system**     | ~6.8%   | 6.0 – 8.7%    | Stable |
| **%idle**       | ~89%    | 68 – 93%      | Very healthy |
| **Total busy**  | ~11%    | -             | Low load |
### When CPU Peaks Occur
The system shows **very consistent daily patterns**:
| Time              | Typical Peak | %user | Total Busy | Frequency | Notes |
|-------------------|--------------|-------|------------|---------|-------|
| **12:00 PM – 12:10 PM** | **Highest** | 18–24% | **~25–31%** | Every day | **Main peak** |
| **07:10 AM – 07:20 AM** | High        | 10–17% | ~18–25%    | Every day | Morning spike |
| **11:10 AM, 11:50 AM**  | Medium      | 8–13%  | ~15–20%    | Frequent | - |
| **02:40 PM – 03:10 PM** | Medium      | 7–11%  | ~15–20%    | Frequent | - |
| **02:40 AM – 03:10 AM** | Medium      | 7–13%  | ~15–22%    | Occasional | Night spike |
### Key Observations
- **Biggest and most consistent peak**: **12:00 PM – 12:10 PM** every day (reaches ~30% CPU).
. . .


A quick shell command

We can also generate some code:
[frdenis@myvm ~]$ ask_llm "bash how to find the top 5 biggest files in my directories ?"
Here's the most common and effective way to find the **top 5 largest files** in a directory (including subdirectories):
### From current directory:
```bash
find . -type f -exec du -h {} + 2>/dev/null | sort -rh | head -5
```
### From root (entire system) — requires `sudo`:
```bash
sudo find / -type f -exec du -h {} + 2>/dev/null | sort -rh | head -5
```
### Alternative (faster, shows size in bytes):
```bash
find . -type f -printf '%s %p\n' | sort -rn | head -5
```
### Explanation:
| Command part | Purpose |
|--------------|--------|
| `find . -type f` | Find only files (ignore directories) |
| `-exec du -h {} +` | Get human-readable sizes |
| `sort -rh` | Sort by size, reverse (largest first), human-readable |
| `head -5` | Show only top 5 |
### Tip:
If you want to **exclude certain directories** (like `/proc`, `/sys`, etc.), you can do:
```bash
sudo find / -path /proc -prune -o -path /sys -prune -o -type f -exec du -h {} + 2>/dev/null | sort -rh | head -5
```
It is also very useful for crash diagnosis using /var/log/messages, etc... possibilities are endless. Test it and enjoy!

Some bash tips -- 19 -- A generic pretty table output function

Output is key to present our findings and this is even more important in Bash as, for most people, all of this is just raw text on a geek black and white terminal. Also we have to admit that it oftenly takes more time to make a pretty output than to collect the data we are interested in so the output formatting is often treated as an afterthought. I have already shown how to get a nice output using column, all of my scripts have nice outputs but they are specific and the formatting needs to be redone for each script.
This is why I came up with a generic function formatting data from arrays which I have been using for a while now. I will just be using the first 5 lines of a generic /etc/passwd file as an example below.


Sourcing the Script

The idea is to keep this function in a dedicated file (let's name it print_table.sh) and then source it when you need it.
[frdenis@myvm ~]$ source print_table.sh
[frdenis@myvm ~]$


Preparing the data

The print_table() function expects a Bash array of comma-separated strings (CSV style). The first element of the array (index 0) is always treated as the header row.
Let's take the first 5 lines of /etc/passwd as our data source:
[frdenis@myvm ~]$ head -5 /etc/passwd
root:x:0:0:root:/root:/bin/bash
daemon:x:1:1:daemon:/usr/sbin:/usr/sbin/nologin
bin:x:2:2:bin:/bin:/usr/sbin/nologin
sys:x:3:3:sys:/dev:/usr/sbin/nologin
sync:x:4:65534:sync:/bin:/bin/sync
[frdenis@myvm ~]$


Basic Table Usage

To render this as a table, we construct a Bash array, define our header as the first element, replace the ":" delimiters with commas "," and pass the array by reference:
source ./print_table.sh
# Initialize array and create data[0] which is our table header
data=("Username,Password,UID,GID,Comment,Home,Shell")

# Read /etc/passwd line by line and append into the ""data" array
while IFS= read -r line; do
    data+=("$(echo "$line" | tr ':' ',')")
done < <(head -5 /etc/passwd)

# Print the table
print_table data

| Username | Password | UID |  GID  | Comment |   Home    |       Shell       |
------------------------------------------------------------------------------
|   root   |    x     |  0  |   0   |  root   |   /root   |     /bin/bash     |
|  daemon  |    x     |  1  |   1   | daemon  | /usr/sbin | /usr/sbin/nologin |
|   bin    |    x     |  2  |   2   |   bin   |   /bin    | /usr/sbin/nologin |
|   sys    |    x     |  3  |   3   |   sys   |   /dev    | /usr/sbin/nologin |
|   sync   |    x     |  4  | 65534 |  sync   |   /bin    |     /bin/sync     |
------------------------------------------------------------------------------


Customizing Alignment & Row Count

By default, all column contents are centered. You can customize alignment per column by passing a second array containing positional alignment codes:
  • l : Left alignment
  • c : Center alignment (default)
  • r : Right alignment
You can also display the total number of processed rows at the bottom by setting L_SHOW_TOTAL="True".
[frdenis@myvm ~]$ cat demo_align.sh
#!/bin/bash
source ./print_table.sh

data=("Username,Password,UID,GID,Comment,Home,Shell")
while IFS= read -r line; do
    data+=("$(echo "$line" | tr ':' ',')")
done < <(head -5 /etc/passwd)

# Define column alignments: Left, Center, Right, Right, Left, Left, Left
align=("l" "c" "r" "r" "l" "l" "l")

# Enable total row count display
export L_SHOW_TOTAL="True"

print_table data align
[frdenis@myvm ~]$ ./demo_align.sh

| Username | Password | UID |   GID | Comment | Home      | Shell             |
----------------------------------------------------------------------------------
| root     |    x     |   0 |     0 | root    | /root     | /bin/bash         |
| daemon   |    x     |   1 |     1 | daemon  | /usr/sbin | /usr/sbin/nologin |
| bin      |    x     |   2 |     2 | bin     | /bin      | /usr/sbin/nologin |
| sys      |    x     |   3 |     3 | sys     | /dev      | /usr/sbin/nologin |
| sync     |    x     |   4 | 65534 | sync    | /bin      | /bin/sync         |
----------------------------------------------------------------------------------
Number of rows: 5
[frdenis@myvm ~]$


Generating Value Summaries (Comma Lists)

A unique feature of this function is the ability to automatically generate comma-separated summaries of specific columns beneath the table. This is very useful when you want to feed list outputs directly into subsequent script commands or quickly copy/paste them.
Pass the 1-based column indices as parameter 3, and an optional row limit as parameter 4:
[frdenis@myvm ~]$ cat demo_summary.sh
#!/bin/bash
source ./print_table.sh

data=("Username,Password,UID,GID,Comment,Home,Shell")
while IFS= read -r line; do
    data+=("$(echo "$line" | tr ':' ',')")
done < <(head -5 /etc/passwd)

# Request summary list for Column 1 (Usernames) and Column 3 (UIDs), max 3 rows
print_table data "" "1,3" 3
[frdenis@myvm ~]$ ./demo_summary.sh

| Username | Password | UID | GID   | Comment | Home      | Shell             |
----------------------------------------------------------------------------------
|   root   |    x     |  0  |   0   |  root   |   /root   |     /bin/bash     |
|  daemon  |    x     |  1  |   1   | daemon  | /usr/sbin | /usr/sbin/nologin |
|   bin    |    x     |  2  |   2   |   bin   |   /bin    | /usr/sbin/nologin |
|   sys    |    x     |  3  |   3   |   sys   |   /dev    | /usr/sbin/nologin |
|   sync   |    x     |  4  | 65534 |  sync   |   /bin    |     /bin/sync     |
----------------------------------------------------------------------------------

Username values (up to 3): root,daemon,bin
UID values (up to 3): 0,1,2

[frdenis@myvm ~]$

Scripting Integration: RAW Output Mode

When passing data downstream in pipeline operations, ASCII borders can get in the way. You can bypass the table rendering entirely by enabling L_RAW="True". This outputs the raw array content without borders or alignments:
[frdenis@myvm ~]$ L_RAW="True" ./demo.sh
Username,Password,UID,GID,Comment,Home,Shell
root,x,0,0,root,/root,/bin/bash
daemon,x,1,1,daemon,/usr/sbin,/usr/sbin/nologin
bin,x,2,2,bin,/bin,/usr/sbin/nologin
sys,x,3,3,sys,/dev,/usr/sbin/nologin
sync,x,4,65534,sync,/bin,/bin/sync
[frdenis@myvm ~]$
Pro Tip: Using L_RAW="True" makes your scripts dual-purpose. They can produce human-friendly interactive CLI tables by default, or clean CSV data when piped into other tools.


< Previous shell tip / Next shell tip coming soon >

Python venv

A lot of application running on our VMs use python. As python evolves a lot and is extensible through modules, it is very frequent that a user do not have the correct modules / modules versions he needs for his project.
To keep it clean and flexible, we do not want to install python packages at the system level, we want each non-privileged user to be using python virtual environment. Note that the base python version requested by the user will need to be installed at the system level.


Proxy

Depending on your company, you may need a proxy to be able to install any python version or module:
export https_proxy=http://www-proxy-your_company.com:80


Example

Below example will be using a non-privileged user "frdenis" on the myvm VM.
[frdenis@myvm ~]$ id
uid=1003(frdenis) gid=1003(frdenis) groups=1003(frdenis) context=unconfined_u:unconfined_r:unconfined_t:s0-s0:c0.c1023
[frdenis@myvm ~]$
The default python of the system is 3.6.8:
[opc@myvm ~]$ python -V
Python 3.6.8
[opc@myvm ~]$
Python 3.11 will need to be installed as the example will showcase a python3.11 virtual environment:
[opc@myvm ~]$ sudo dnf install -y python3.11 python3.11-pip
. . .
[opc@myvm ~]$ python3.11 -V
Python 3.11.13
[opc@myvm ~]$


Python venv


Check the system python

[frdenis@myvm ~]$ type python
python is /usr/bin/python
[frdenis@myvm ~]$ /usr/bin/python --version
Python 3.6.8
[frdenis@myvm ~]$

Create and activate a venv

We will name this virtual environment "venv" in this example which is the usage.
[frdenis@myvm ~]$ python -V
Python 3.6.8
[frdenis@myvm ~]$ python3.11 -m venv venv             <== the second "venv" is the name of your venv
[frdenis@myvm ~]$ source venv/bin/activate
(venv) [frdenis@myvm ~]$ python -V            <== note that starting "(venv)" showing you are IN the virtual env
Python 3.11.13
(venv) [frdenis@myvm ~]$

Install packages in the venv

Once the venv activated, we can install any module we want in it and as our non-privileged user:
(venv) [frdenis@myvm ~]$ python
Python 3.11.13 (main, Apr 27 2026, 16:44:16) [GCC 8.5.0 20210514 (Red Hat 8.5.0-28.0.1)] on linux
Type "help", "copyright", "credits" or "license" for more information.
>>> import numpy                               <== numpy is not default
Traceback (most recent call last):
  File "<stdin>", line 1, in <module>
ModuleNotFoundError: No module named 'numpy'
>>> quit()
(venv) [frdenis@myvm ~]$ export https_proxy=http://www-proxy-hqdc.us.oracle.com:80
(venv) [frdenis@myvm ~]$ pip install numpy
Collecting numpy
  Downloading numpy-2.4.6-cp311-cp311-manylinux_2_27_x86_64.manylinux_2_28_x86_64.whl (16.9 MB)
     ━━━━━━━━━━━━━━━━━━━━━━━━━━━━━━━━━━━━━━━━ 16.9/16.9 MB 9.2 MB/s eta 0:00:00
Installing collected packages: numpy
Successfully installed numpy-2.4.6
[notice] A new release of pip available: 22.3.1 -> 26.2.1
[notice] To update, run: pip install --upgrade pip
(venv) [frdenis@myvm ~]$ python
Python 3.11.13 (main, Apr 27 2026, 16:44:16) [GCC 8.5.0 20210514 (Red Hat 8.5.0-28.0.1)] on linux
Type "help", "copyright", "credits" or "license" for more information.
>>> import numpy
>>>

Showcase

Let's write a simple python script using numpy:
[frdenis@myvm ~]$ cat test_env.py
import sys
import numpy as np
print("Python Version :", sys.version.split()[0])
print("Numpy Version  :", np.__version__)
print("Numpy Test     :", np.array([10, 20, 30]) * 2)
[frdenis@myvm ~]$
It works in the venv:
(venv) [frdenis@myvm ~]$ python test_env.py
Python Version : 3.11.13
Numpy Version  : 2.4.6
Numpy Test     : [20 40 60]
(venv) [frdenis@myvm ~]$
But not outside of the venv (as numpy is not default) and has only been installed in the venv:
(venv) [frdenis@myvm ~]$ deactivate
[frdenis@myvm ~]$ python test_env.py
Traceback (most recent call last):
  File "test_env.py", line 2, in <module>
    import numpy as np
ModuleNotFoundError: No module named 'numpy'
[frdenis@myvm ~]$


Automatically use the venv

As it may not be nice to source the venv each time we want to run a python script (from a shell for example), 2 solutions exist for that:

Run the script using the venv python

[frdenis@myvm ~]$ ~/venv/bin/python test_env.py
Python Version : 3.11.13
Numpy Version  : 2.4.6
Numpy Test     : [20 40 60]
[frdenis@myvm ~]$

Use a shebang which points to the venv

[frdenis@myvm ~]$ cat test_env.py
#!/home/frdenis/venv/bin/python                             <== here, this is the shebang, adapt to your path
import sys
import numpy as np
print("Python Version :", sys.version.split()[0])
print("Numpy Version  :", np.__version__)
print("Numpy Test     :", np.array([10, 20, 30]) * 2)
[frdenis@myvm ~]$ chmod u+x test_env.py                   <== has to be done only once when setting it up
[frdenis@myvm ~]$ ./test_env.py
Python Version : 3.11.13
Numpy Version  : 2.4.6
Numpy Test     : [20 40 60]
[frdenis@myvm ~]$


Transfer a venv to another user/machine

Note: Do NOT copy the "venv" directory to another user or machine, it contains hardcoded absolute paths and machine specifics which wont make it work.

Export the module list

[frdenis@myvm ~]$ source venv/bin/activate
(venv) [frdenis@myvm ~]$ pip freeze > requirements.txt
(venv) [frdenis@myvm ~]$ cat requirements.txt
numpy==2.4.6
(venv) [frdenis@myvm ~]$

Re-apply to another virtual env

Once this requirements.txt file has been transferred:
[new_user@another_vm ~]$ python3.11 -m venv new_venv             <== create a new venv
[new_user@another_vm ~]$ source new_venv/bin/activate            <== activate the new venv
[new_user@another_vm ~]$ pip install -r requirements.txt         <== reinstall the modules from the original venv
. . .
[new_user@another_vm ~]$

OCI: Datapump between 23ai ADB and 19c ADB using database link

Now that we know how to manually create a 23ai ADB in OCI, that we also know how to create a database link between a 23ai ADB and a 19C ADB, let's now try a datapump between a 19c ADB and a 23ai ADB (oh, this is also a migration method, right?) using a database link.
First, let's remind our environment:
[fred@myvm ~]$ cd wallet_23ai
[fred@myvm wallet_23ai]$ export TNS_ADMIN=$(pwd)
[fred@myvm wallet_23ai]$ sqlplus admin/"Iw0ntt3lly0u"@sandbox01_high
SQL> select banner_full from v$version;
BANNER_FULL
--------------------------------------------------------------------------------
Oracle Database 23ai Enterprise Edition Release 23.0.0.0.0 - Production
Version 23.6.0.24.10
SQL> select banner_full from v$version@TO_19C;
BANNER_FULL
--------------------------------------------------------------------------------
Oracle Database 19c Enterprise Edition Release 19.0.0.0.0 - Production
Version 19.25.0.1.0
SQL>
Let's datapump that ~ 50 million rows table from our 19C ADB:
SQL> select count(*) from USER_19C.TABLE_19C@TO_19C;
COUNT(*)
----------
 48930604
SQL>
Let's create a simple datapump parfile (nothing specific compared to a "classic" Oracle database):
[fred@myvm ~]$ cat imp.par
TABLES=USER_19C.TABLE_19C
TABLE_EXISTS_ACTION=append
REMAP_SCHEMA=USER_19C:USER_23C
network_link=TO_19C
encryption_pwd_prompt=no
directory=DATA_PUMP_DIR
logfile=imp.log
[fred@myvm ~]$
And run it:
[fred@myvm ~]$ impdp admin/"Iw0ntt3lly0u"@sandbox01_high parfile=imp.par
Import: Release 21.0.0.0.0 - Production on Thu Nov 21 15:47:06 2024
Version 21.14.0.0.0
Copyright (c) 1982, 2024, Oracle and/or its affiliates.  All rights reserved.
Connected to: Oracle Database 23ai Enterprise Edition Release 23.0.0.0.0 - Production
Starting "ADMIN"."SYS_IMPORT_TABLE_01":  admin/********@sandbox01_high parfile=imp.par
Processing object type TABLE_EXPORT/TABLE/TABLE
. . imported "USER_23C"."TABLE_19C"               48930604 rows
Processing object type TABLE_EXPORT/TABLE/GRANT/OWNER_GRANT/OBJECT_GRANT
Processing object type TABLE_EXPORT/TABLE/STATISTICS/TABLE_STATISTICS
Job "ADMIN"."SYS_IMPORT_TABLE_01" completed successfully at Thu Nov 21 16:09:50 2024 elapsed 0 00:22:41
[fred@myvm ~]$
That was very easy and pretty fast: 22 minutes for 48 million lines (with no parallel, this example table was not partitioned).

OCI: ADB 23ai to ADB 19c Database link

This one is very similiar to OCI: Database Link between 2 Autonomous Databases 19c but this time it is the creation of a database link from a 23ai ADB to a 19c ADB. The only difference on top of the version is that I will be creating a private DB Link and not a public DB Link. This is more to ensure that everything is working as expected. I'll put very less comment here aseach step has already been detailed in OCI: Database Link between 2 Autonomous Databases 19c.
Get the 19c DB wallet:
[fred@myvm ~]$ mkdir adb19c_wallet
[fred@myvm ~]$ oci db autonomous-database generate-wallet --autonomous-database-id ocid1.autonomousdatabase.oc1.iad.l4pq7nwusgtxorjiszblek2aqqe2b4jusqtcw5fuev6bwcntifaaq5lna3bl --file adb19c_wallet/adb19c_wallet.zip --password "abc123456"
Downloading file  [####################################]  100%
[fred@myvm ~]$ cd adb19c_wallet
[fred@myvm adb19c_wallet]$ ls -ltr
-rw-rw-r--. 1 frdenis frdenis 21964 Nov 20 12:21 adb19c_wallet.zip
[fred@myvm adb19c_wallet]$ unzip adb19c_wallet.zip
Archive:  adb19c_wallet.zip
  inflating: ewallet.pem
  inflating: README
  inflating: cwallet.sso
  inflating: tnsnames.ora
  inflating: truststore.jks
  inflating: ojdbc.properties
  inflating: sqlnet.ora
  inflating: ewallet.p12
  inflating: keystore.jks
[fred@myvm adb19c_wallet]$
Create a directory into the 23ai database:
[fred@myvm adb19c_wallet]$ cd ../wallet_23ai/
[fred@myvm wallet_23ai]$ export TNS_ADMIN=$(pwd)
[fred@myvm wallet_23ai]$ sqlplus admin/"Iw0ntt3lly0u"@sandbox01_high
SQL>*Plus: Release 21.0.0.0.0 - Production on Wed Nov 20 12:22:22 2024
Version 21.14.0.0.0
Copyright (c) 1982, 2022, Oracle.  All rights reserved.
Last Successful login time: Tue Nov 19 2024 15:35:47 +00:00
Connected to:
Oracle Database 23ai Enterprise Edition Release 23.0.0.0.0 - Production
Version 23.6.0.24.10
SQL> create directory wallet19c as 'wallet19c';
Directory created.
SQL> select DIRECTORY_NAME, DIRECTORY_PATH from dba_directories where DIRECTORY_NAME = 'WALLET19C';
DIRECTORY_NAME        DIRECTORY_PATH
----------------   -----------------------------------------------------------------
WALLET19C            /u03/dbfs/27409389D44E5891E063D911000A6123/data/wallet19c
SQL> select * from dbms_cloud.list_files('WALLET19C');
no rows selected
SQL>
Move the cwallet.sso file into a directory into the 23ai database (long journey to copy a file):
[fred@myvm ~]$ oci os bucket create --name wallet --compartment-id $COMP_DEV
[fred@myvm ~]$ oci os object put --bucket-name wallet --file adb19c_wallet/cwallet.sso
[fred@myvm ~]$ oci iam auth-token create --user-id ocid1.user.oc1..4p2paj5vy5ghhx7ayavkqoiqarqaqomx3jroqabkl32aze7qpamp7wfkfayo --description fred_cred_for_wallet_dblink
. . .
    "token": "9m>1x0heLR4bDe:{8lnT",
. . .
[fred@myvm ~]$ sqlplus admin/"Iw0ntt3lly0u"@sandbox01_high
Connected to:
Oracle Database 23ai Enterprise Edition Release 23.0.0.0.0 - Production
Version 23.6.0.24.10
SQL> show user
USER is "ADMIN"
SQL> begin
  2  DBMS_CLOUD.CREATE_CREDENTIAL(credential_name => 'fred_cred_for_wallet_dblink', username => 'fred', password => '9m>1x0heLR4bDe:{8lnT') ;
  3  end;
  4  /
PL/SQL procedure successfully completed.
SQL>
[fred@myvm ~]$ NAMESPACE=$(oci os ns get | jq -r '.data')
[fred@myvm ~]$ REGION="us-ashburn-1"
[fred@myvm ~]$ BUCKET_NAME="wallet"
[fred@myvm ~]$ FILE="cwallet.sso"
[fred@myvm ~]$ echo "https://${NAMESPACE}.objectstorage.${REGION}.oci.customer-oci.com/n/${NAMESPACE}/b/${BUCKET_NAME}/o/${FILE}"
https://qdci7zudoklt.objectstorage.us-ashburn-1.oci.customer-oci.com/n/qdci7zudoklt/b/wallet/o/cwallet.sso
[fred@myvm ~]$ 
SQL> begin
  2  DBMS_CLOUD.GET_OBJECT(
  3  object_uri => 'https://qdci7zudoklt.objectstorage.us-ashburn-1.oci.customer-oci.com/n/qdci7zudoklt/b/wallet/o/cwallet.sso',
  4  directory_name => 'WALLET19C',
  5  credential_name => 'fred_cred_for_wallet_dblink');
  6  end;
  7  /
PL/SQL procedure successfully completed.
SQL> SELECT OBJECT_NAME, BYTES, CREATED from DBMS_CLOUD.LIST_FILES('WALLET19C');
OBJECT_NAME           BYTES CREATED
---------------- ---------- -----------------------------------
cwallet.sso            5349 20-NOV-24 02.35.52.642528 PM +00:00
SQL>
Create some credentials on the 23ai DB (a user and password from the target 19c database are needed):
SQL> show user
USER is "ADMIN"
SQL> begin
  2  DBMS_CLOUD.CREATE_CREDENTIAL(credential_name => 'TO_19C', username => 'ADMIN', password => 'xxxx');
  3  end;
  4  /
PL/SQL procedure successfully completed.
SQL>
And create the database link:
SQL> BEGIN
 DBMS_CLOUD_ADMIN.CREATE_DATABASE_LINK(
 db_link_name => 'TO_19C',
 hostname => '19cDB_host.adb.us-ashburn-1.oraclecloud.com',
 port => '1522',
 service_name => '1a0e3d6a347c8g0_19cDB_high.adb.oraclecloud.com',
 credential_name => 'TO_19C',
 directory_name => 'WALLET19C',
 private_target => TRUE,
 public_link => FALSE);
 END;
 /
 PL/SQL> procedure successfully completed.
SQL>
And finally time to test!
SQL> select banner_full from v$version;
BANNER_FULL
--------------------------------------------------------------------------------
Oracle Database 23ai Enterprise Edition Release 23.0.0.0.0 - Production
Version 23.6.0.24.10
SQL> select banner_full from v$version@TO_19C;
BANNER_FULL
--------------------------------------------------------------------------------
Oracle Database 19c Enterprise Edition Release 19.0.0.0.0 - Production
Version 19.25.0.1.0
SQL>
And you can drop a database link as below:
SQL> begin
  2  DBMS_CLOUD_ADMIN.DROP_DATABASE_LINK(db_link_name => 'MY_PUBLIC_DBLINK', public_link => FALSE);     # Private DB Link
  3  end;
  4  /
PL/SQL procedure successfully completed.
SQL> begin
  2  DBMS_CLOUD_ADMIN.DROP_DATABASE_LINK(db_link_name => 'MY_PRIVATE_DB_LINK', public_link => TRUE);     # Public DB Link
  3  end;
  4  /
PL/SQL procedure successfully completed.
SQL>

OCI: Manual creation of a 23ai Autonomous Database

Command line is always more powerful than fancy GUIs; let's then push our mouse away and use our keyboard to create an OCI 23ai Autonomous Database in command line!

Keep in mind that you will need to have your API keys set up to be able to achive this.

Details about the oci db autonomous-database options I have used (many more options are available in the documentation but I did not need more than that below):
  • --compartment-id $COMP_DEV
  • The compartment ID you want to create your ADB in; as these OCID are very big, I set them up in my environment then I can use $COMP_DEV and $COMP_PROD in my command lines which is very easier. Example how I set them up in my ~/.bash_profile:
    export  COMP_DEV="ocid1.compartment.oc1..4vhfbmozrpwnoq55axatbwaazgpa6qjkxnaua6rziz7w7t6chcbwlaba5kx3"
    export COMP_PROD="ocid1.compartment.oc1..bwekagnozpeaiaddbadzyc5e3u4tumnp5uaa2jyu4zajptweazuzqtzqnlbu"
    
    To easily get all our compartment IDs (again, see how the command line is more powerful than the GUI), you may want to use this command:
    [fred@ocivm ~]$ oci search resource structured-search --limit 1000 --query-text "query compartment resources" | jq -r '.data.items[] | ."display-name", ."identifier", ."lifecycle-state", ."time-created"' | paste - - - - | sort | column -t -o " | " -N "CompartmentName,CompartmenId,Status,TimeCreated"
    CompartmentName   | CompartmenId                                                                        | Status | TimeCreated
    dev               | ocid1.compartment.oc1..4vhfbmozrpwnoq55axatbwaazgpa6qjkxnaua6rziz7w7t6chcbwlaba5kx3 | ACTIVE | 2023-11-16T18:56:37.105000+00:00
    prod              | ocid1.compartment.oc1..bwekagnozpeaiaddbadzyc5e3u4tumnp5uaa2jyu4zajptweazuzqtzqnlbu | ACTIVE | 2023-07-27T01:21:27.399000+00:00
    . . .
    [fred@ocivm ~]$
  • --db-name SANDBOX01
  • The database name. Note that:
    "message": "The Autonomous Database name can contain only alphanumeric characters."
  • --display-name SANDBOX01
  • This is the name which you will see displayed in the Autonomous Database list in the console; it can be different from the database name; I would recommend keeping things clear and simple so here I used the same as db name for the 23ai sandbox I was creating.

  • --admin-password "Iw0ntt3lly0u"
  • Self explanatory; admin is the DBA user of your database. I would have liked better the old system user but it is what it is. To be fair system may have been confusing so a new admin user makes sense.

  • --backup-retention-period-in-days 7
  • This is a sandbox database so I do not need a big retention period (which you will pay for); I even wanted not to back it up but I could not find a way (so far).

  • --compute-model ECPU --compute-count 2
  • 2 ECPUs will be enough for my sandbox; it also auto scales and can be increased very easily so better start small to reduce the bill and see how it goes

  • --data-storage-size-in-tbs 1
  • 1 TB will be enough for my testing; as above, it is also easy to increase and will scale up so no need to start with huge sizes

  • --db-workload OLTP
  • To get an ATP (Autonomous Transaction Processing) database and not an ADB (Autonomous DataWarehouse) database which would be --db-workload OLTP; other possible values in this documentation.

  • --db-version 23ai
  • Self explanatory

  • --is-auto-scaling-for-storage-enabled TRUE --is-auto-scaling-enabled TRUE
  • To auto scale storage and ECPU.

  • --is-mtls-connection-required FALSE
  • I do not need MTLS authentication so I set it to FALSE

  • --subnet-id ocid1.subnet.oc1.iad.5wauf57el5sryyzarwk3ga2akt6a5yaa5aacp3a25etmid7i2hgwtsyjqfxa
  • The subnet for the database; you can find it using the below command:
    [fred@ocivm ~]$ oci network subnet list --compartment-id ocid1.compartment.oc1..aaaaaaaa5mo7xe6lo4kd7qcs4lncynnpbhhekno6p3kmbgct5gt35yszs5iq | jq -r '.data[] | ."display-name", .id' | paste - - | column -t -o " | " -N "Subnet,OCID"
    Subnet        | OCID
    dev-subnet | ocid1.subnet.oc1.iad.5wauf57el5sryyzarwk3ga2akt6a5yaa5aacp3a25etmid7i2hgwtsyjqfxa
    [fred@ocivm ~]$
    
    If your tenancy is kind of complex, you may not know which compartment your subnet is in; then use the search command to find your subnet-id:
    [fred@ocivm ~]$ oci search resource structured-search --limit 1000 --query-text "query subnet resources" | jq -r '.data.items[] | ."display-name", ."compartment-id", .identifier' | paste - - - | column -t -o " | " -N "Subnet,CompartmentID,OCID"
    Subnet         | CompartmentID                                                                       | OCID
    dev-subnet     | ocid1.compartment.oc1..anlaaascjgudaqxpqbwgsluealssn5atihgwdqnf5xmandazdoj233xjmfpa | ocid1.subnet.oc1.iad.5wauf57el5sryyzarwk3ga2akt6a5yaa5aacp3a25etmid7i2hgwtsyjqfxa
    prd-subnet     | ocid1.compartment.oc1..4kosa3azap6geam5mh36gsptc7ylds5q5hannec7inbab4alkonycqtx5oak | ocid1.subnet.oc1.iad.gzx5ryiqa3ata2mka7ywai35lye55aad2fwpeawhuagfk652arat5ytssjc7
    . . .
    [fred@ocivm ~]$


Let's now run the command:
[fred@ocivm ~]$ oci db autonomous-database create --compartment-id $COMP_DEV --db-name SANDBOX01 --display-name SANDBOX01 --admin-password "Iw0ntt3lly0u" --backup-retention-period-in-days 7 --compute-model ECPU --compute-count 2 --data-storage-size-in-tbs 1 --db-workload OLTP --db-version 23ai --is-auto-scaling-for-storage-enabled TRUE --is-auto-scaling-enabled TRUE --is-mtls-connection-required FALSE --subnet-id ocid1.subnet.oc1.iad.5wauf57el5sryyzarwk3ga2akt6a5yaa5aacp3a25etmid7i2hgwtsyjqfxa
. . .
    "backup-retention-period-in-days": 7,
    "compute-count": 2.0,
    "compute-model": "ECPU",
. . .
  "opc-work-request-id": "ocid1.coreservicesworkrequest.oc1.iad.vkzqanhcknwelipjs2w2cbjd2a33q3673bvft7t7lf62uf6zq3akvr6j2ubv"
}
[fred@ocivm ~]$
You will end up with a bunch of JSON data on the screen and a work id as the autonomous database creation will run in the background. You can check the status using the below command:
[fred@ocivm ~]$ oci db autonomous-database list --compartment-id $COMP_DEV | jq -r '.data[] | ."display-name", ."defined-tags"."Oracle-Tags".CreatedBy, (."time-created" | gsub("[.][0-9].*$";"")), ."lifecycle-state"' | paste - - - - | column -t -o " | " -N "DBName,CreatedBy,TimeCreated,Status"
DBName       | CreatedBy                          | TimeCreated         | Status
SANDBOX01    | default/myemail@company.com        | 2024-10-29T08:45:30 | PROVISIONING
[fred@ocivm ~]$
Just wait a bit (it is pretty fast) and your ATP will be created (I also add the OCID below):
[fred@ocivm ~]$ oci db autonomous-database list --compartment-id $COMP_DEV | jq -r '.data[] | ."display-name", ."defined-tags"."Oracle-Tags".CreatedBy, (."time-created" | gsub("[.][0-9].*$";"")), ."lifecycle-state", .id' | paste - - - - - | column -t -o " | " -N "DBName,CreatedBy,TimeCreated,Status,OCID"
DBName       | CreatedBy                          | TimeCreated         | Status    | OCID
SANDBOX01    | default/myemail@company.com        | 2024-10-29T08:45:30 | AVAILABLE | ocid1.autonomousdatabase.oc1.iad.wq2q2ba6a2butxrnakxeww3zgwe2blznjw6ic26ndzjxcklvu2kbk2m2cur6
[fred@ocivm ~]$
And below the output of a script I have started working on to nicely show your tenancy resources (a kind of a rac-status but for your OCI tenancy; I'll share it when ready):
    ADBName   |      AvailDomain     |  Tag |  OpenMode  | Type | Version | CPUs | Model|  DataTB | AllocTB |  UsedTB |     TimeCreated     |   MaintenanceBegin  |    MaintenanceEnd   |
-----------------------------------------------------------------------------------------------------------------------------------------------------------------------------------------
   SANDBOX01  | mdRX:US-ASHBURN-AD-3 | null | READ_WRITE | OLTP |   23ai  |  2.0 | ECPU |    1    |   0.01  |  0.01   | 2024-10-29T08:45:30 | 2024-11-03T08:00:00 | 2024-11-03T10:00:00 |
-----------------------------------------------------------------------------------------------------------------------------------------------------------------------------------------
Let's now connect to that new 23ai database; first download and unzip the wallet:
[fred@ocivm ~]$ mkdir wallet_23ai  
[fred@ocivm ~]$ oci db autonomous-database generate-wallet --autonomous-database-id ocid1.autonomousdatabase.oc1.iad.wq2q2ba6a2butxrnakxeww3zgwe2blznjw6ic26ndzjxcklvu2kbk2m2cur6 --file "wallet_23ai/wallet_23ai.zip" --password "abc123456"  
Downloading file  [####################################]  100%
[fred@ocivm ~]$ cd wallet_23ai/
[fred@ocivm wallet_23ai]$ ls -ltr  
total 24
-rw-rw-r--. 1 fred fred 21984 Oct 29 12:29 wallet_23ai.zip
[fred@ocivm wallet_23ai]$ unzip wallet_23ai.zip  
Archive:  wallet_23ai.zip
  inflating: ewallet.pem
  inflating: README
  inflating: cwallet.sso
  inflating: tnsnames.ora
  inflating: truststore.jks
  inflating: ojdbc.properties
  inflating: sqlnet.ora
  inflating: ewallet.p12
  inflating: keystore.jks
[fred@ocivm wallet_23ai]$
Update the sqlnet.ora file with your wallet location:
[fred@ocivm ~]$ vi sqlnet.ora
[fred@ocivm ~]$ cat sqlnet.ora
WALLET_LOCATION = (SOURCE = (METHOD = file) (METHOD_DATA = (DIRECTORY="/home/fred/wallet_23ai/")))
SSL_SERVER_DN_MATCH=no
[fred@ocivm ~]$
Get your TNS admin alias:
[fred@ocivm ~]$ vi sqlnet.ora
[fred@ocivm ~]$ head -1 tnsnames.ora
sandbox01_high = (description= (retry_count=20)(retry_delay=3)(address=(protocol=tcps)(port=1522)(host=xxx.adb.us-ashburn-1.oraclecloud.com))(connect_data=(service_name=yyy_sandbox01_high.adb.oraclecloud.com))(security=(ssl_server_dn_match=no)))
[fred@ocivm ~]$
And connect:
[fred@ocivm ~]$ export TNS_ADMIN=$(pwd)
[fred@ocivm ~]$ sqlplus admin/"Iw0ntt3lly0u"@sandbox01_high
SQL*Plus: Release 21.0.0.0.0 - Production on Tue Nov 19 15:35:47 2024
Version 21.14.0.0.0
Copyright (c) 1982, 2022, Oracle.  All rights reserved.
Last Successful login time: Tue Nov 19 2024 15:28:30 +00:00
Connected to:
Oracle Database 23ai Enterprise Edition Release 23.0.0.0.0 - Production
Version 23.6.0.24.10
SQL> select banner_full from v$version;
BANNER_FULL
--------------------------------------------------------------------------------
Oracle Database 23ai Enterprise Edition Release 23.0.0.0.0 - Production
Version 23.6.0.24.10
SQL>


Finally, if you just wanted to manual create a 23 ai autonomous database as a learning experience, you may not want to delete it which is also easy:
[fred@ocivm ~]$ oci db autonomous-database delete --autonomous-database-id ocid1.autonomousdatabase.oc1.iad.wq2q2ba6a2butxrnakxeww3zgwe2blznjw6ic26ndzjxcklvu2kbk2m2cur6
Are you sure you want to delete this resource? [y/N]: y
[fred@ocivm ~]$
Check the status of the operation:
[fred@ocivm ~]$ oci db autonomous-database list --compartment-id $COMP_DEV | jq -r '.data[] | ."display-name", ."defined-tags"."Oracle-Tags".CreatedBy, (."time-created" | gsub("[.][0-9].*$";"")), ."lifecycle-state", .id' | paste - - - - - | column -t -o " | " -N "DBName,CreatedBy,TimeCreated,Status,OCID"
DBName       | CreatedBy                                | TimeCreated         | Status      | OCID
SANDBOX01    | default/myemail@company.com              | 2024-10-29T08:45:30 | TERMINATING | ocid1.autonomousdatabase.oc1.iad.wq2q2ba6a2butxrnakxeww3zgwe2blznjw6ic26ndzjxcklvu2kbk2m2cur6
[fred@ocivm ~]$
And done!
[fred@ocivm ~]$ oci db autonomous-database list --compartment-id $COMP_DEV | jq -r '.data[] | ."display-name", ."defined-tags"."Oracle-Tags".CreatedBy, (."time-created" | gsub("[.][0-9].*$";"")), ."lifecycle-state", .id' | paste - - - - - | column -t -o " | " -N "DBName,CreatedBy,TimeCreated,Status,OCID"
DBName       | CreatedBy                                | TimeCreated         | Status     | OCID
SANDBOX01    | default/myemail@company.com              | 2024-10-29T08:45:30 | TERMINATED | ocid1.autonomousdatabase.oc1.iad.wq2q2ba6a2butxrnakxeww3zgwe2blznjw6ic26ndzjxcklvu2kbk2m2cur6
[fred@ocivm ~]$

Some bash tips -- 18 -- paste

This blog is part of a shell tips list which are good to know -- the whole list can be found here.

I really like finding a real usage for a Unix command you heard of, you have somewhere in your quiver but you never really used because you never found an opportunity to or you never found the good combo which makes it very powerful. Let's explore the power of paste which we will end up combining with fold, shuf and column.

First, let's generate a simple list of numbers, one number per line using seq:
$ seq 1 7
1
2
3
4
5
6
7
$
Now let's say you want to organize these numbers by columns of two numbers. Hmmm not that easy right? this where paste shines:
$ seq 1 7 | paste - -
1       2
3       4
5       6
7
$
See these 2 hyphens in paste - -? There are the number of columns you want paste to organize your data in; you want 4 columns? just use 4 hyphens:
$ seq 1 7 | paste - - - - 
1       2       3       4
5       6       7
$
It also makes very easy something oftenly hapenning: rows to columns. paste has the -s/--serial option for that, check below:
$ seq 1 7 | paste -s
1       2       3       4       5       6       7
$
Pretty cool, right? And maybe a CSV type output would be a very good idea as well. paste also got you covered; Indeed, by default paste uses a TAB as a separator which we can change using -d/--delimiters:
$ seq 1 7 | paste -s -d ","
1,2,3,4,5,6,7
$
And what about a CSV with 2 columns per line?
$ seq 1 7 | paste - -  -d ","
1,2
3,4
5,6
7,
$
Note that all of that also works from a file as well:
$ seq 1 7 > test_file
$ cat test_file | paste - -  -d ","
1,2
3,4
5,6
7,
$
Cool but what about a real life example. Let's say we want to create a nice table like list of our OCI Autonomous Databases. The command to get that would be:
$ oci search resource structured-search --limit 1000 --query-text "query AutonomousDatabase resources return allAdditionalFields where lifecyclestate != 'TERMINATED'" |
$
This would generate a JSON with tons (too much) of information and JSON is not really human readable. We could then first use jq to only get the information we are interested in:
$ oci search resource structured-search --limit 1000 --query-text "query AutonomousDatabase resources return allAdditionalFields where lifecyclestate != 'TERMINATED'" | jq -r '.data.items[] | ."additional-details".dbName,."additional-details".ecpuCount,."additional-details".workloadType, ."additional-details".dataStorageSizeInTBs,."lifecycle-state", (."time-created" | gsub("[.][0-9].*$";""))'
PROD2
32.0
ATP
8
AVAILABLE
2024-09-02T07:49:32
PROD1
64.0
ADW
0
AVAILABLE
2023-12-06T02:20:58
TEST1
48.0
ADW
0
AVAILABLE
2023-11-29T02:07:21
$
We indeed get the information we need but it is not really readable. I guess you already guessed how to make it readable: paste! We have 6 values per Autonomous Database, so just use 6 hypens in the paste command:
$ oci search resource structured-search --limit 1000 --query-text "query AutonomousDatabase resources return allAdditionalFields where lifecyclestate != 'TERMINATED'" | jq -r '.data.items[] | ."additional-details".dbName,."additional-details".ecpuCount,."additional-details".workloadType, ."additional-details".dataStorageSizeInTBs,."lifecycle-state", (."time-created" | gsub("[.][0-9].*$";""))' | paste - - - - - -
PROD2        32.0    ATP     8       AVAILABLE       2024-09-02T07:49:32
PROD1        64.0    ADW     0       AVAILABLE       2023-12-06T02:20:58
TEST1        48.0    ADW     0       AVAILABLE       2023-11-29T02:07:21
$
Oh, this is very better! One would tell me that we can also do that using jq using join or @tsv and you would be correct but paste will work with non JSON outputs.

You also know that you can easily add a -d "," to get that output in CSV but let's keep it text based as I want that list from my terminal on my VM quickly when I need it and I would like that output to be nicer. This is where column comes into play! column makes nice columns (adapting the size of the columns) from outputs and can also add some nice column separators to look like a table (I won't re show the whole long oci | jq command for viibility):
$ oci search . . . | paste - - - - - - | sort | column -t -o " | "
PROD1 | 64.0 | ADW | 0 | AVAILABLE | 2023-12-06T02:20:58
PROD2 | 32.0 | ATP | 8 | AVAILABLE | 2024-09-02T07:49:32
TEST1 | 48.0 | ADW | 0 | AVAILABLE | 2023-11-29T02:07:21
$
column can also add a header for each column:
$ oci search . . . | paste - - - - - - | sort | column -t -o " | " -N "DBName,ECPU,Type,TBs,Status,TimeCreated"
DBName | ECPU | Type | TBs | Status    | TimeCreated
PROD1  | 64.0 | ADW  | 0   | AVAILABLE | 2023-12-06T02:20:58
PROD2  | 32.0 | ATP  | 8   | AVAILABLE | 2024-09-02T07:49:32
TEST1  | 48.0 | ADW  | 0   | AVAILABLE | 2023-11-29T02:07:21
$
Last but not least, it is also easy to hide columns; let's hide the ECPU (column2) and the TBs (column 4) numbers (by the way, I contacted support as the TBs for my ADW is 0 which looks like a bug):
$ oci search . . . | paste - - - - - - | sort | column -t -o " | " -N "DBName,ECPU,Type,TBs,Status,TimeCreated" -H2,4
DBName | Type | Status    | TimeCreated
PROD1  | ADW  | AVAILABLE | 2023-12-06T02:20:58
PROD2  | ATP  | AVAILABLE | 2024-09-02T07:49:32
TEST1  | ADW  | AVAILABLE | 2023-11-29T02:07:21
$
Super cool and super easy!

Now, let's get back to another good combo using paste. We sometimes need to anonymize data (when writing a blog for example) and this can be a bit painful; what if we could have a tool automatically shuffling the characters of what we want to anonymize for us? Let's go back to our sequence of 7 numbers I opened with and we let's use the shuf command which will shuffle the lines of this output:
$ seq 1 7 | shuf
4
7
2
5
1
6
3
$
We now automatically recognize the kind of input which can be serialized by paste; let's do it:
$ seq 1 7 | shuf | paste -s -d ''
1547362
$
Note: the output is always different as shuf will shuffle the data differently each time it is executed. This is very cool, we now just need to find something which transform a list of characters to one character per line (indeed, we won't use seq but real data to be anonymized); a kind of unpaste command; as usual, those crazy Unix creators thought about everything and this command is... fold which wraps lines up to a number of character which we can set to 1 for our need:
$ echo "1234567"
1234567
$echo "1234567" | fold -w 1
1
2
3
4
5
6
7
$
We now have the combo we wanted:
$ echo "1234567" | fold -w 1 | shuf | paste -s -d ''
5347162
$ echo "1234567" | fold -w 1 | shuf | paste -s -d ''
3746215
$ echo "1234567" | fold -w 1 | shuf | paste -s -d ''
7253416
$
You have here a string anonymizer; if you use that on an OCID for example:
$ echo "anuwcljt6ubcb2aa6hv52fnv343cvqhvwit7fedl4q7beqd2gw2fkhr4mhma" | fold -w 1 | shuf | paste -s -d ''
4cqah43jdkv23uqu2l22thmlwvrbqbawhnf4ncevewfgh5f6atmb7dvc6i7a
$
Well, good luck to find the original one back!

And all of this for ~ 100 KB:
$ du -sh /usr/bin/shuf
48K     /usr/bin/shuf
$ du -sh /usr/bin/fold
36K     /usr/bin/fold
$ du -sh /usr/bin/paste
36K     /usr/bin/paste
$
Now that you've learnt how to make some cool combos with paste, fold, shuf and column, ask the below question to your colleagues:


That's all for this one; enjoy and... keep it simple!
< Previous shell tip / Next shell tip >

OCI: Database Link between 2 Autonomous Databases 19c

Database links are seen by some as evil and as wonderful tools by others. Whatever your side on this, let's see how we can create database links between 2 autonomous databases. The characteristics of the below example are:
  • We want to get data from the PROD1 database
  • The database link will be created into the PROD2 database
  • A network connectivity is already setup between the databases; the ones in this example are in the same tenancy and in the same region; if your databases are in different tenancies, you want to check this documentation first; if they are in different regions, you please have a look at this documentation first
  • The databases can be in the same compartment or not; below example is with 2 databases in different compartments
  • The autonomous databases can be ADW or ATP, it does not matter
  • I will use one and unique Linux VM with a non privileged user fred@myvm on that VM
  • Many operations are only doable by the ADMIN user so be sure you know the ADMIN user credentials
  • Below assumes that your OCI client is configured and works

A summary of what needs to be done looks straigthforward on a graph:
But the fact that these are autonomous databases implies many steps which I will be describing in this blog.
Let's follow and detail each of the steps shown on the above picture.

0/ Requirements summary

A short summary of the requirements to be able to create a DB Link:
  • Network connectivity between the 2 databases
  • A database username and password on PROD1
  • The PROD1 database certificate
  • OCIDs of PROD1, PROD2, your compartments, etc...

1/ Get the PROD1 wallet

Ge the PROD1 database OCID from the console and use it to get the database wallet from your Linux VM:
[fred@myvm ~] oci db autonomous-database generate-wallet --autonomous-database-id ocid1.autonomousdatabase.oc1.iad.xxx --file adb_wallet.zip --password "abc123456"
Downloading file  [####################################]  100%
[fred@myvm ~] ls -ltr adb_wallet.zip
-rw-rw-r--. 1 fred fred 21974 Sep 30 13:05 adb_wallet.zip
[fred@myvm ~]
Note that we must specify a wallet password using this oci db autonomous-database generate-wallet command; related error message you would face (I tried :)) are:
Error: Missing option(s) --password.
"message": "The wallet download password cannot be an empty string.",
"message": "The wallet download password must be at least 8 characters.",
You can also download this wallet from the console: "Autonomous database details" => "Database connection" => "Download wallet"; we won't use this password so feel free to forget that password immediately! Let's unzip the wallet and points the files we will be interested in:
[fred@myvm ~] unzip adb_wallet.zip
Archive:  adb_wallet.zip
  inflating: ewallet.pem
  inflating: README
  inflating: cwallet.sso     <== the certificate we will work with
  inflating: tnsnames.ora    <== we will need host, service and port information at the end of the procedure
  inflating: truststore.jks
  inflating: ojdbc.properties
  inflating: sqlnet.ora
  inflating: ewallet.p12
  inflating: keystore.jks
[fred@myvm ~]
All right, step 1 was easy, let's jump into step 2.

2/ Transfer the certificate

This one looks simple but many steps are needed to achieve the transfer of the certificate; indeed, we have to transfer the PROD1 cwallet.sso file into a PROD2 directory (DBFS). The steps to achieve that are:
  • 2.1/ Create a bucket (unless you already have one)
  • 2.2/ Copy the cwallet.sso file from your Linux VM into your bucket
  • 2.3/ Create a directory into the PROD2 database
  • 2.4/ Copy the cwallet.sso file from your bucket into the PROD2 PROD2 directory
  • 2.5/ Drop your bucket if you created one just for this transfer
And on top of that, we will need to create some credentials to get authenticated here and there. Yeaaaahh all of that just to copy a file . . . hopefully it is a one time thing :)

2.1/ Create a bucket (unless you already have one)

You'll find your PROD2 database compartment OCID in the console (search for "Compartment"):
[fred@myvm ~] oci os bucket create --name wallets --compartment-id ocid1.compartment.oc1..aaaaaaabbbbbbbbcccccccccccfffffffff  
{
    . . .
        "CreatedBy": "default/fred",
        "CreatedOn": "2024-09-30T13:07:25.850Z"
    . . .
    "name": "wallets",
    . . .
}
[fred@myvm ~]


2.2/ Copy the cwallet.sso file from your Linux VM into your bucket

[fred@myvm ~] oci os object put --bucket-name wallets --file cwallet.sso  
Uploading object  [####################################]  100%
{
  "etag": "9fba7327-d979-4b21-a898-8b795ea02f76",
  "last-modified": "Mon, 30 Sep 2024 13:09:42 GMT",
  "opc-content-md5": "sstACFWtW/4qBGNkdH/iuQ=="
}
 [fred@myvm ~]
Check that the file has been correctly copied into the wallet:
[fred@myvm ~] oci os object list --bucket-name wallets
{
  "data": [
      . . .
      "name": "cwallet.sso",
      . . .
}
[fred@myvm ~]


2.3/ Create a directory into the PROD2 database

Note that as of now only ADMIN can create directories and DB Links.
SQL> show user
USER is "ADMIN"
SQL> create directory wallets as 'wallets';
Directory created.
SQL> select OWNER, DIRECTORY_NAME, DIRECTORY_PATH from dba_directories where directory_name = 'WALLETS';
OWNER    DIRECTORY_NAME   DIRECTORY_PATH
-------- ---------------- --------------------------------------------------------------------------------
SYS      WALLETS          /u03/dbfs/0B3BHK09F13420009KP8/data/wallets
SQL>


2.4/ Copy the cwallet.sso file from your bucket into the PROD2 database directory

We now need to create somne credentials to achieve this. I use to go with "Auth tokens" which are kind of the same tokens you use for github if you are familiar with. You'll need your user-id which you can find in the console "Your profile" (top right) => "My profile" then copy your OCID in "User information" or in the ~/.oci/config file (grep user ~/.oci/config):
[fred@myvm ~] oci iam auth-token create --user-id ocid1.user.oc1..xxxx --description fred_cred_for_wallet_dblink
  {
  "data": {
    "description": "fred_cred_for_wallet_dblink",  <== it is actually the credential name
    . . .
    "token": "c]CBZfi97_E(;U5",                    <== your token
    "user-id": "ocid1.user.oc1..xxxx"
  },
  "etag": "89c91cb65f03452fabd74c618609d0bb"
}
[fred@myvm ~]
You can also use the console to get a token: "Your profile" (top right) => "My profile" => "Auth tokens" (bottom left) => "Generate token".

Now create the credentials (as ADMIN):
SQL> show user
USER is "ADMIN"
SQL> BEGIN
  2  DBMS_CLOUD.CREATE_CREDENTIAL(credential_name => 'fred_cred_for_wallet_dblink', username => 'fred', password => 'c]CBZfi97_E(;U5');
  3  END;
  4  /
PL/SQL procedure successfully completed.
SQL>
Note that I kept "c]CBZfi97_E(;U5')" as token instead of putting "xxxx"; it is to show what an Auth token looks like, it is obviously not my real token. Also, the user used here is the one you connect to your tenancy with the console so most likely your email address.

Now to copy the cwallet.sso file into the WALLETS directory, we need to know the path of that file; for now we just know that it is located into the wallets bucket. You can find this path from the console in "Object Details" on the right of the file when you list the content of your bucket. I could not find a way to get that info using the oci client, this is then an opportunity to learn how these paths are built and build it ourselves.

Object paths are of this form (I put shell variables in the path as this is how we're gonna build it):
https://${NAMESPACE}.objectstorage.${REGION}.oci.customer-oci.com/n/${NAMESPACE}/b/${BUCKET_NAME}/o/${FILE}
We can find these values as below:
[fred@myvm ~] NAMESPACE=$(oci os ns get | jq -r '.data')
[fred@myvm ~] REGION="us-ashburn-1"     <== this can be found in the ~/.oci/config file
[fred@myvm ~] BUCKET_NAME="wallets"
[fred@myvm ~] FILE="cwallet.sso"
[fred@myvm ~] echo "https://${NAMESPACE}.objectstorage.${REGION}.oci.customer-oci.com/n/${NAMESPACE}/b/${BUCKET_NAME}/o/${FILE}"
https://ihdfd7683hjkz.objectstorage.us-ashburn-1.oci.customer-oci.com/n/ihdfd7683hjkz/b/wallets/o/cwallet.sso
[fred@myvm ~]
And we get file path of the file! We can finally copy the cwallet.sso file from our bucket into the directory (DBFS)!
SQL> show user
USER is "ADMIN"
SQL> BEGIN
  2  DBMS_CLOUD.GET_OBJECT(
  3  object_uri => 'https://ihdfd7683hjkz.objectstorage.us-ashburn-1.oci.customer-oci.com/n/ihdfd7683hjkz/b/wallets/o/cwallet.sso',
  4  directory_name => 'WALLETS',
  5  credential_name => 'fred_cred_for_wallet_dblink');
  6  END;
  7  /
PL/SQL procedure successfully completed.
SQL> SELECT OBJECT_NAME, BYTES, CREATED, LAST_MODIFIED from DBMS_CLOUD.LIST_FILES('WALLETS');
OBJECT_NAME             BYTES CREATED                                            LAST_MODIFIED
------------------ ---------- ------------------------------------------------ ---------------------------------------------
cwallet.sso              5349 30-SEP-24 02.21.22.000000 PM +00:00                30-SEP-24 02.21.22.000000 PM +00:00
SQL>


2.5/ Drop your bucket if you created one just for this transfer

If you have created a dedicated bucket for this transfer, you may want to drop it to keep things clean, we won't need it anymore.
[fred@myvm ~] oci os bucket delete --name wallets
Are you sure you want to delete this bucket? [y/N]: y
[fred@myvm ~]


3/ Create the DB Link

OK! we can now create the DB Link -- after we create some more credentials: the credentials to connect to the PROD1 database:
SQL> BEGIN
2  DBMS_CLOUD.CREATE_CREDENTIAL(credential_name => 'PROD1_USER', username => 'A_PROD1_USER', password => 'xxxxxxxxxx');
3  END;
4  /
PL/SQL procedure successfully completed.
SQL>
And (finally !) create the DB Link. You'll need the below information from the tnsnames.ora file from the wallet we generated during step 1:
  • hostname => xxxxxxx.adb.us-ashburn-1.oraclecloud.com
  • port => 1522
  • service_name => yyyyyyy.adb.oraclecloud.com
SQL> BEGIN
  2  DBMS_CLOUD_ADMIN.CREATE_DATABASE_LINK(
  3  db_link_name => 'TO_PROD1',
  4  hostname => 'xxxxxxx.adb.us-ashburn-1.oraclecloud.com',
  5  port => '1522',
  6  service_name => 'yyyyyyy.adb.oraclecloud.com',
  7  credential_name => 'PROD1_USER',
  8  directory_name => 'WALLETS',
  9  private_target => TRUE,
 10  public_link => TRUE);
 11  END;
 12  /
PL/SQL procedure successfully completed.
SQL>


And now the moment of truth: testing the DB Link !
SQL> select count(*) from user_objects@SOURCE_DATABASE;
  COUNT(*)
----------
      1994
SQL>


Congratulations, now go enjoy your new DB Link between your 2 autonomous databases!

OCI: Setting up API Keys

GUI interfaces are nice and beautiful but they are usually less efficient than the command line. Let's explore how to set up API Keys in OCI (Oracle Cloud Infrastructure) to be able to use the command line instead of the OCI Console.

First of all, we need to have the oci-cli installed which is installed by default on OCI VMs:
[fred@myvm ~]$ type oci
oci is /usr/local/bin/oci
[fred@myvm ~]$ oci --version
3.47.0
[fred@myvm ~]$
If it is not installed on your system, the install doc can be found here for all the supported systems, it takes a minute.
So let's start by, let's say, try to create a bucket using the command line (you'l find the compartment id of the compartment you want to create your bucket in the compartment page, just seach for "compartment" in the OCI console):
[fred@myvm ~]$ oci os bucket create --name this_is_my_bucket --compartment-id gdsgshdsgbjgfjhfgdhfgdsjhgdjhgdfjds
ERROR: Could not find config file at /home/fred/.oci/config
Do you want to create a new config file? [Y/n]: n
[fred@myvm ~]$
So we are asked for a ~/.oci/config file which does not exist by default; we are also offered to create a new one; I would recommend saying no to this question, the following procedure seems awkward to me. Let's create that ~/.oci/config file manually instead.

First, on the top right of the OCi console, click on your profile and "My Profile":
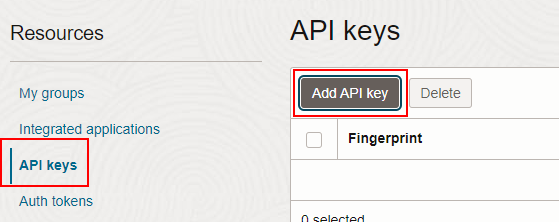
Then, on the bottom left, on "API Keys" and "Add API Key":
Here, you have to download your private key (and do not lose it) -- as mentioned, this is the only time you could do it so keep it safe:
Now is shown to you the content you need to copy into that ~/.oci/config configuration file on your VM:
Let's create this ~/.oci directory and this ~/.oci/config file:
[fred@myvm ~]$ mkdir ~/.oci
[fred@myvm ~]$ vi ~/.oci/config
[fred@myvm ~]$ cat ~/.oci/config
[DEFAULT]
user=ocid1.user.oc1..aaaaaabbbbbccccccccccdddddddddddeeeeeeee
fingerprint=66:xxxxxxxxxxxxxxxxx
tenancy=ocid1.tenancy.oc1.. aaaaaabbbbbccccccccccdddddddddddeeeeeeee
region=us-ashburn-1
key_file=~/.oci/fred_myvm.key
[fred@myvm ~]$
So here I have just pasted in ~/.oci/config the content I copied from the OCI console. There is only one thing to update is to point the key_file parameter to a file which contain the private key you have downloaded in the previous step; you can name this file with whatever name and extension but keep it in the ~/.oci directory. You can just open the private key you have previously downloaded and paste it in the file:
[fred@myvm ~]$ vi ~/.oci/fred_myvm.key
[fred@myvm ~]$
Same as SSH, these files are very strict on permission, thanksfully, Oracle provides a tool which sets everything correctly for us:
[fred@myvm ~]$ oci setup repair-file-permissions --file /home/fred/.oci/config
[fred@myvm ~]$ ls -altr ~/.oci
total 8
-rw-------. 1 fred fred  290 Sep 26 12:28 config
-rw-------. 1 fred fred 1716 Sep 26 12:29 fred_myvm.key
drwx------. 4 fred fred  123 Sep 26 12:29 ..
drwxrwxr-x. 2 fred fred   41 Sep 26 12:29 .
[fred@myvm ~]$
Let's nor retry to create a bucket!
[fred@myvm ~]$ oci os bucket create --name this_is_my_bucket --compartment-id ocid1.compartment.oc1..gdsgshdsgbjgfjhfgdhfgdsjhgdjhgdfjds
{
  "data": {
    "approximate-count": null,
    . . .
    "metadata": {},
    "name": "this_is_my_bucket",
    "namespace": "xxxxx",
    . . .
    "time-created": "2024-09-26T12:35:47.425000+00:00",
  . . .
}
[fred@myvm ~]$
Very cool, we have created a bucket using the command line. Note that I didn't need to specify any profile in my command line as the API keys I added in my ~/.oci/config are in the DEFAULT profile (by the way, profile names are key sensitive and the default one is DEFAULT and not default):
[fred@myvm ~]$ cat ~/.oci/config
[DEFAULT]
user=ocid1.user.oc1..aaaaaabbbbbccccccccccdddddddddddeeeeeeee
fingerprint=66:xxxxxxxxxxxxxxxxx
tenancy=ocid1.tenancy.oc1.. aaaaaabbbbbccccccccccdddddddddddeeeeeeee
region=us-ashburn-1
[fred@myvm ~]$
Note that you can change this which would allow you to use many different configurations to being able to connect to different tenancies from the same OS user or connect to different users (with different privileges) to the same tenancy:
[fred@myvm ~]$ cat ~/.oci/config
[PROD1]
user=ocid1.user.oc1..aaaaaabbbbbccccccccccdddddddddddeeeeeeee
fingerprint=66:xxxxxxxxxxxxxxxxx
tenancy=ocid1.tenancy.oc1..aaaaaabbbbbccccccccccdddddddddddeeeeeeee
region=us-ashburn-1
[PROD2]
user=ocid1.user.oc1..xxxxxxxxxyyyyyyyzzzzzzzzzzz
fingerprint=66:zzzzzzzzzzz
tenancy=ocid1.tenancy.oc1..xxxxxxxxxyyyyyyyzzzzzzzzzzz
region=us-ashburn-1
[fred@myvm ~]$
Above shows a configuration pointing to 2 different tenancies: PROD1 and PROD2. Let's say I created the bucket above in PROD1, I now have to specificy the profile to use as there is no default anymore:
[fred@myvm ~]$ oci os object list --all --bucket-name this_is_my_bucket
ERROR: The config file at ~/.oci/config is invalid:
+Config Errors+---------+----------------------------------------------------------------------------------+
| Key         | Error   | Hint                                                                             |
+-------------+---------+----------------------------------------------------------------------------------+
| user        | missing | log into the console and go to the user's settings page to find their OCID       |
| fingerprint | missing | openssl rsa -pubout -outform DER -in  | openssl md5 -c |
| key_file    | missing | the full path and filename of the private PEM key file                           |
| region      | missing | for example, us-phoenix-1                                                        |
| tenancy     | missing | log into the console and find this OCID at the bottom of any page                |
+-------------+---------+----------------------------------------------------------------------------------+
[fred@myvm ~]$ oci os object list --all --bucket-name this_is_my_bucket --profile PROD1
{
  "prefixes": []   <== there is nothing in my bucket which is expected
}
[fred@myvm ~]$
Unfortunately, you cannot add more to that ~/.oci/config file; it would indeed by handy for example to be able to add the compartment-id not to have to specift it in all the command lines which require it but it may come later, who knows.

Last but not least, mind that any oci command line has a --help option which will show you any possible option; this is pretty well documented:
[fred@myvm ~]$ oci --help
. . .
[fred@myvm ~]$ oci os bucket create --help
. . .
[fred@myvm ~]$
Let's drop that example bucket to keep things clean:
[fred@myvm ~]$ oci os bucket delete --name this_is_my_bucket --profile PROD1
Are you sure you want to delete this bucket? [y/N]: y
[fred@myvm ~]$
And you are now ready ot use the OCI command line!

Move billion of rows between partitioned tables with exchange partition

Oracle Partitioning has been introduced in version 8.0 in 1997 which is a long while ago; I remember starting implementing it myself with version 8.1.6 which is also a while ago. I recently had the opportunity to revisit it to move billion of rows from one partitioned table to another partitioned table and the resources I found online seemed a bit confusing/unclear to me -- thus this blog to have a clear documentation the next time I'll have to do this.

The scenario is as below (I have done this in an Autonamous Database version 19c but it applies to any recent database, 12c included, whether it is autonomous or ... manual? :)):
  • 2 range partitioned tables (same structure), partitioned by day on a date column
  • The first table named FROM_TABLE has 3.2 billion rows and a lot of daily partitions:
  • SQL> select count(*) from FROM_TABLE;
    
      COUNT(*)
    ----------
    3253093566
    
    SQL>
  • The second table named TO_TABLE has 2.8 billion rows and is also daily partitioned:
  • SQL> select count(*) from TO_TABLE;
    
      COUNT(*)
    ----------
    2835819105
    
    SQL>
  • The goal is to transfer all the data from FROM_TABLE to TO_TABLE to then reach a 6 billion rows TO_TABLE table (6088912671 exactly).
  • SQL> select 2835819105+3253093566 from dual;
    
      COUNT(*)
    ----------
    6088912671
    
    SQL>
  • The 2 tables are QUERY HIGH compressed.

The number of rows in these tables making an INSERT AS SELECT too slow, let's go with exchanging the partitions as both tables are partitioned the same way (both tables are basically the same with just different data and we want all the data into the same table: TO_TABLE).
A first thing to know about Oracle Partitioning is that you cannot directly exchange partitions between 2 partitioned tables. This could appear as a severe limitation for our scenario but there is a very simple way to work that around: using a temporary non partitioned table as shown on the below schema:
Here is how it works:

  1. Create a for exchange TEMP table
  2. SQL> create table TEMP for exchange with table FROM_TABLE;
    Table created.  
    SQL>
    

  3. Exchange a partition from FROM_TABLE to TEMP
  4. SQL> alter table FROM_TABLE exchange partition for (TO_DATE(' 2024-06-12 00:00:00', 'SYYYY-MM-DD HH24:MI:SS')) with table TEMP;
    Table altered.
    Elapsed: 00:00:00.14
    SQL>
    
    As this operation is a metadata only one, you see it is very fast, it took no time to move quite a bit of data:
    SQL> select count(*) from TEMP;
      COUNT(*)
    ----------
      55157674
    SQL>
    
    Indeed, this partition has 55 million lines, this is a competitive timing.
    You may wonder where/how do I get that TO_DATE(' 2024-06-12 00:00:00', 'SYYYY-MM-DD HH24:MI:SS'); this is the HIGH_VALUE column from user_tab_partitions.
    SQL> select table_name, partition_name, high_value from user_tab_partitions where table_name = 'FROM_TABLE';
    TABLE_NAME           PARTITION_NAME       HIGH_VALUE
    ----------------- -------------------- ------------------------------------------------------------------------------------------------------------------------
    FROM_TABLE         SYS_P1234            TO_DATE(' 2024-08-31 00:00:00', 'SYYYY-MM-DD HH24:MI:SS', 'NLS_CALENDAR=GREGORIAN')
    FROM_TABLE         SYS_P1567            TO_DATE(' 2024-09-01 00:00:00', 'SYYYY-MM-DD HH24:MI:SS', 'NLS_CALENDAR=GREGORIAN')
    . . .
    SQL>
    Note that you can omit the gregorian calendar thing, we have been using this calendar for around 700 years, it is pretty safe to assume the date is in the gregorian calendar. This is also very useful to very quickly count the number of rows in a partition, I'll show an example below.

  5. Exchange the partition from TEMP to TO_TABLE
  6. We can now finalize the move by exchanging the partition to the target TO_TABLE partition:
    SQL> alter table TO_TABLE exchange partition for (TO_DATE(' 2024-06-12 00:00:00', 'SYYYY-MM-DD HH24:MI:SS')) with table TEMP;
    Table altered.
    Elapsed: 00:00:00.45
    SQL>
    Same here, very fast operation. We can check that TEMP does not contain any row any more and the rows are now in the TO_TABLE table:
    SQL> select count(*) from TEMP;
      COUNT(*)
    ----------
             0
    SQL> select count(*) from TO_TABLE partition for (TO_DATE(' 2024-06-12 00:00:00', 'SYYYY-MM-DD HH24:MI:SS'));
      COUNT(*)
    ----------
      55157674
    SQL>


That was easy and fast, now the question is how to make that process more or less automatic to run that against a lot of partitions. What I did is I first queried user_tab_partitions to get the HIGH_VALUE of each partitions of the FROM_TABLE. As HIGH_VALUE is a LONG (deprecated since version 8.0 . . .), you need PL/SQL to manage it so I simply pasted the list of all the HIGH_VALUE into a file and generated all the commands:
$ cat all_high_values.txt | awk '{print "alter table FROM_TABLE exchange partition for ("$0") with table TEMP;"; print "alter table TO_TABLE exchange partition for ("$0") with table TEMP;";}' > move_part.sql
$
And I executed the generated SQL file:
SQL> @move_part
Table altered.
Elapsed: 00:00:00.10
Table altered.
Elapsed: 00:00:04.43
etc . . .
SQL>
After a few minutes moving all the partitions, I could check and confirm the expected number of rows in each of the table involved in this process:
SQL> select count(*) from TO_TABLE;
  COUNT(*)
----------
6088912671
Elapsed: 00:00:37.06
SQL> select count(*) from FROM_TABLE;
  COUNT(*)
----------
         0
Elapsed: 00:00:00.01
SQL> select count(*) from TEMP;
  COUNT(*)
----------
         0
Elapsed: 00:00:00.01
SQL> drop table TEMP;
Table dropped.
Elapsed: 00:00:00.13
SQL>

A last note is that my FROM_TABLE and TO_TABLE are QUERY HIGH compressed but the exchange table is not compressed; the partition will nonetheless stayed compressed during their journey from FROM_TABLE and TO_TABLE.

And this is how to move billion of rows between partitioned tables with exchange partition!

How to use OCI Gen AI from the Linux command line

OCI Generative AI offers an on-demand service which you can access from your tenancy and pay only for what you use. This is very handy and...